


Accessories
Emerson SW95 Speed Control can be used with this fan.
4
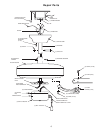
8. Attach the ceiling cover (item 4) to the hanger bracket
(item 1) using the two canopy setscrews.
9. Remove rubber packing grommets from the motor and
discard. They are for shipping protection only.
10. Attach the five blades (item 6) to their blade flanges
(item 7) using the 3/16-24 x 5/16” screws provided.
11. Attach the blades to the fan motor with the ten 1/4-20 x
1/2” screws. Tighten the blades securely to the motor.
Failure to securely tighten the blades could result in fan
wobble. Attach the ball and chain to the pull chain.
12. Turn on the electricity. Check to see that the fan for-
ward and reverse speeds work properly. Use the pull
chain switch to cycle through the three fan speed, plus
off. Use the reversing slide switch on the switch hous-
ing to change fan direction. Make sure blades come to
a complete stop before changing fan direction.
Installation is now complete.
To reduce the risk of personal injury, do not bend the
blade flanges when installing the flanges, balancing
the blades, or cleaning the fan. Do not insert foreign
objects between rotating fan blades.
Check to see that all connections are tight, including
ground, and that no bare wire is visible at the wire
connectors, except for the ground wire. Do not
operate fan until blades are in place. Noise and fan
damage could result.
To reduce the risk of fire or electrical shock, do not
use the fan with any solid-state speed control device.
Do not use water when cleaning you fan, as it could
damage the motor or blades and create the possibili-
ty of an electrical shock.
Any control not specifically approved for this fan
could result in fire, shock, and personal injury.
This product is designed to use only those parts
supplied with this product and/or any accessories
designated specifically for use with this product by
Emerson Company. Substitution of parts or acces-
sories not designated for use with this product by
Emerson Company could result in personal injury or
properly damage.
WARNING
!
WARNING
!
WARNING
!
WARNING
!
WARNING
!
WARNING
!
Maintenance
1. Do not use abrasive cleaners which may cut through
the protective lacquer and possibly damage the finish,
use only a soft brush or lint free cloth to avoid scratch-
ing finish. Do not use water when cleaning you fan, as it
could damage the motor or blades and create the possi-
bility of an electrical shock.
7. Connect the green grounding lead from the hanger ball and
the green grounding lead from the hanger bracket to the
grounding conductor of supply (this may be a bare wire or
wire with green colored insulation). Securely
connect wires with wire connectors supplied.
Securely connect the fan motor white wire to the supply
white (neutral) wire using wire connector supplied. Securely
connect the fan motor black wire and the blue wire to the
supply black (hot) wire using wire connector supplied. After
connections have been made, separate the white and green
leads from the black and blue leads. Carefully turn the leads
upward and push the green and white leads into one side of
the outlet box. Then push the black and blue leads into the
other side of the outlet box.
To avoid possible fire or shock, make sure that the
electrical wires are completely inside the outlet box
and not pinched between the ceiling cover and the
ceiling.
WARNING
!