


7
Using Your Ceiling Fan
1. Restore electrical power to the outlet box by turning
the electricity on at the main fuse box.
2. Check the operation of the fan by gently pulling on
the 4-position speed control pull chain switch. The
operating sequence is as follows:
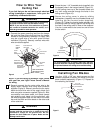
3. If airflow is desired in opposite direction, turn your
fan off and wait for the blades to stop turning, then
press the rocker switch located on top of the motor
housing, and turn the fan on again. The fan blades
will turn in the opposite direction and reverse
airflow.
Attaching Light Kit
To install an accessory light kit, remove the two
screws securing the switch housing cover to the
switch housing. Remove the screw plug from the bot-
tom of the switch housing cover and install the light kit
in accordance with the light kit Owner's Manual.
Maintenance
IMPORTANT CARE INSTRUCTIONS
for your Ceiling Fan
Periodic cleaning of your new ceiling fan is the only
maintenance that is needed.
When cleaning, use only a soft brush or lint free cloth
to avoid scratching the finish.
Abrasive cleaning agents are not required and should
be avoided to prevent damage to finish.
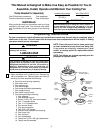
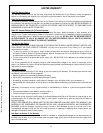
2. Use the 10 round recessed holes in the motor hub
marked with "5" and install the five blade
assemblies in accordance with Step 3.
3. Attach one blade assembly to the motor hub using
two 10-32 x 5/8" oval head screws (supplied)
(Figure 12). Do not tighten completely at this time.
Install four remaining blade assemblies in the
same way. Gently snug all flange screws to the
motor hub, working around the hub in a clockwise
sequence. Next, securely tighten all flange
screws, again working in a clockwise sequence.
Failure to follow this procedure could result in fan
wobble. This completes the blade installation.
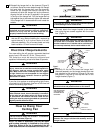
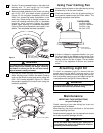
4. Slip the pull chain through the bushing in the
switch housing cover. Position the switch housing
cover on the switch housing and secure using two
8-32 x 3/8” screws (supplied) (Figure 13). Secure
the pendant (supplied) to the pull chain using the
connector (supplied).
MOTOR
HUB
10-32 x 5/8"
OVAL HEAD SCREW
(2 Per Blade Assembly)
Figure 12
SWITCH
HOUSING
COVER
PULL
CHAIN
8-32 x 3/8" SCREW
Figure 13
To reduce the risk of personal injury, do not bend the
blade flanges when installing the flanges, balancing
the blades, or cleaning the fan. Do not insert foreign
objects between rotating fan blades.
WARNING
!
SPEED CONTROL
PULL CHAIN SWITCH
REVERSING
SWITCH
To avoid possible electrical shock, be sure electricity is
turned off at the main fuse box before wiring.
WARNING
!
Do not use water when cleaning your ceiling fan. It
could damage the motor or the blades and create the
possibility of an electrical shock.
WARNING
!
THREE-SPEED
1st Pull—HIGH
2nd Pull—Medium
3rd Pull—Low
4th Pull—OFF