


8
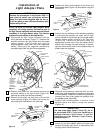
Installation of
Light Adapter Plate
NOTE: In order to use the light adapter plate
(supplied), the wiring harness included as part of
the light fixture assembly must be removed and be
reinstalled in the light adapter plate. This Section
contains the procedures to accomplish this.
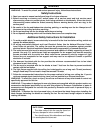
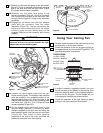
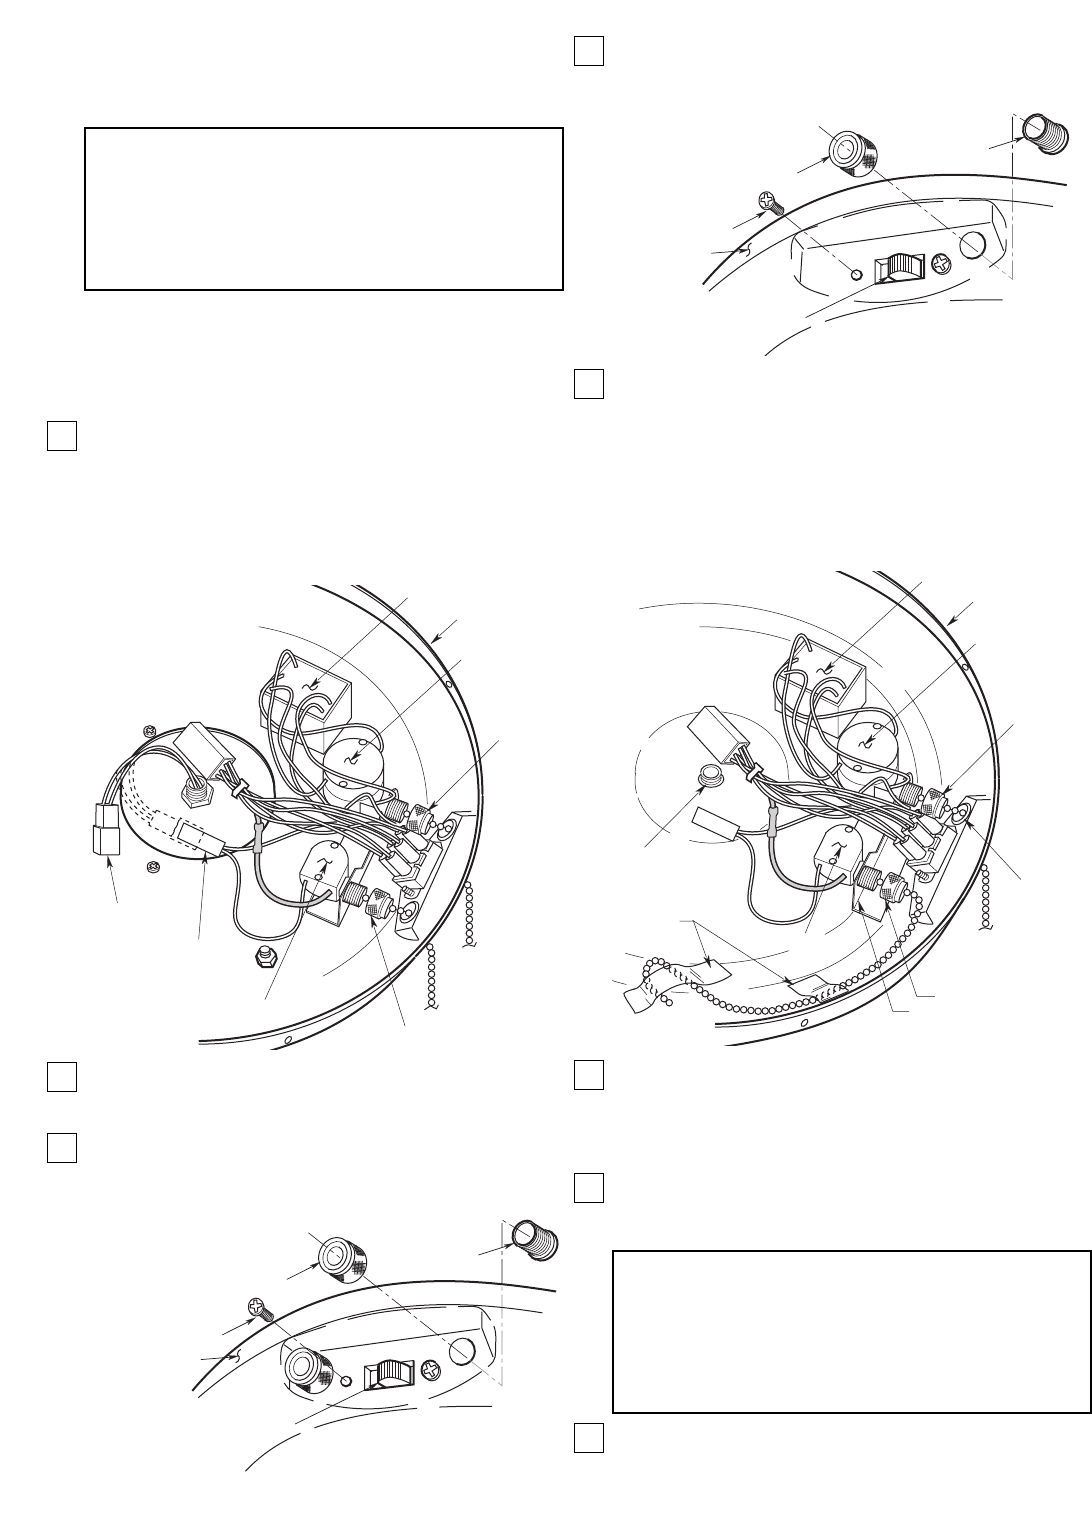
1. Disconnect the light fixture connector from the
wiring harness connector (Figure 17). Unscrew the
knurled nuts from the light switch and the speed
control switch. (The knurled nuts are not
interchangeable; keep them with their respective
switch.) Gently pry the capacitor (secured by
two-sided tape) from the light fixture assembly.
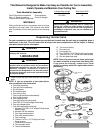
2. Remove and retain the two screws securing the
reversing switch to the light fixture (Figure 18).
Remove and retain the harness assembly.
3. Remove the knurled nut from one of the switch
chain bushings (Figure 18). Retain the knurled nut
and bushing for installation in the next step.
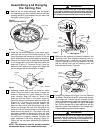
4. Position the switch chain bushing in the hole in the
light adapter plate (Figure 19) and secure using the
knurled nut.
5. Position the two switches of the harness assembly
in the mounting bracket; the small switch (light
switch) installs in the left hole and the larger switch
(speed control switch) installs in the right hole
(Figure 20). Secure the switches using the
appropriate knurled nuts. Pass the speed control
switch chain through the chain bushing. If desired,
tape the other switch chain to the adapter plate as
shown (tape not supplied).
6. Remove one protective covering from the two-
sided foam tape (supplied) and apply the foam tape
to the capacitor. Remove the remaining protective
covering and then firmly press the capacitor onto
the adapter plate (Figure 20).
7. Position the reversing switch in the slot in the
adapter plate and secure using two screws
(Figure 19).
8. Remove the screw plug (Figure 20) from the
bottom of the light adapter plate and install your
optional Emerson light fixture in accordance with
the light fixture Owner’s Manual.
IMPORTANT
Perform the procedures in this Section ONLY if
you intent to install your ceiling fan without
using the light fixture supplied with the fan, or
if you are going to use a different Emerson light
fixture with your fan.
IMPORTANT
The next three steps (step 8, 9 and 10) are to
be performed ONLY if you are installing an
optional Emerson light fixture. If you are
installing your fan without a light fixture,
proceed to step 11.
LIGHT FIXTURE
ASSEMBLY
CAPACITOR
SPEED CONTROL
SWITCH
KNURLED
NUT
KNURLED NUT
LIGHT SWITCH
DISCONNECT
THE LIGHT
FIXTURE
CONNECTOR
FROM THE
WIRING
HARNESS
CONNECTOR
WIRING
HARNESS
CONNECTOR
Figure 17
SCREW (2)
KNURLED NUT
SWITCH CHAIN
BUSHING
REVERSING
SWITCH
LIGHT FIXTURE
ASSEMBLY
Figure 18
SCREW (2)
KNURLED NUT
SWITCH CHAIN
BUSHING
REVERSING
SWITCH
LIGHT ADAPTER
PLATE
Figure 19
LIGHT ADAPTER
PLATE
CAPACITOR
SPEED CONTROL
SWITCH
KNURLED
NUT
KNURLED NUT
LIGHT SWITCH
SCREW
PLUG
CHAIN
BUSHING
MOUNTING BRACKET
TAPE
Figure 20