7
WIRING INSTRUCTIONS
7. With the cabinet installed, the air cleaner can now be
wired to electrical input source.
WARNING
!
Installation of this unit must comply with local
electric codes or other applicable codes.
Review and understand local codes prior to in-
stallation.
Failure to do so could result in serious personal
injury or death.
8. The air cleaner must be wired through the furnace
controls. This unit requires a 120 VAC 60 Hz input
circuit. A 20 amp circuit is more than adequate.
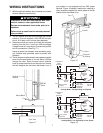
9. Remove junction box cover and install the required
bushing into the 3/4 in. knock out. With the supply
voltage turned off, route three (3) wires into junction
box for connections. (See Fig. 17.)
Insure all wires are clamped, wire connectors prop-
erly installed and grommets used to prevent wire
abrasion.
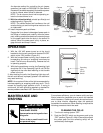
10. The air cleaner must be wired to have power supplied
when the furnace blower is on and there is airflow
through the duct. Some furnace control modules
have an output terminal for an electronic air cleaner
that will energize the unit when the blower is on. If
your system is not equipped with an EAC output
terminal, Figure 19 shows a method for installing a
relay (customer supplied) to switch power to the air
cleaner when the blower is on.
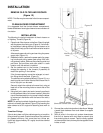
Vertical
Section
Tape All
Joints
Wood Block
Figure 16
Front View
Hot
Hot
Grounding
Conductor
Figure 17
Floor
Conduit
Duct
Electronic
Air Cleaner
Figure 18
Cooling Fan
Relay
(External)
N.O.
N.O.
Brown
Fan Control
(Open)
N.O.
N.O.
N.C.
N.C.
N.C.
120 Volt
60 Hz
120 Volt
60 Hz
120 Volt
Relay (OFF)
(Customer
Supplied)
120 Volt
2 Speed
Fan
Hi
Lo
C
Electronic
Air Cleaner
Cooling Mode - Fan Operating in Hi Speed
Cooling Fan
Relay
(External)
N.O.
N.O.
Brown
BlackBlack
Fan Control
(Closed)
N.O.
N.O.
N.C.
N.C.
N.C.
120 Volt
60 Hz
120 Volt
60 Hz
120 Volt
Relay (ON)
(Customer
Supplied)
120 Volt
2 Speed
Fan
Hi
Lo
C
Electronic
Air Cleaner
Heating Mode - Fan Operating in Low Speed
Figure 19


