7
Maintenance
Caution: Turn off the switch and unplug the
electrical cord before maintenance.
Important: Improper installation of the brush roll
or brush roll belt could cause carpet or cleaner
damage.
HOW TO REPLACE THE
HEPA FILTER ASSEMBLY
(FILTER CODE EF107)
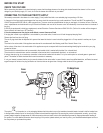
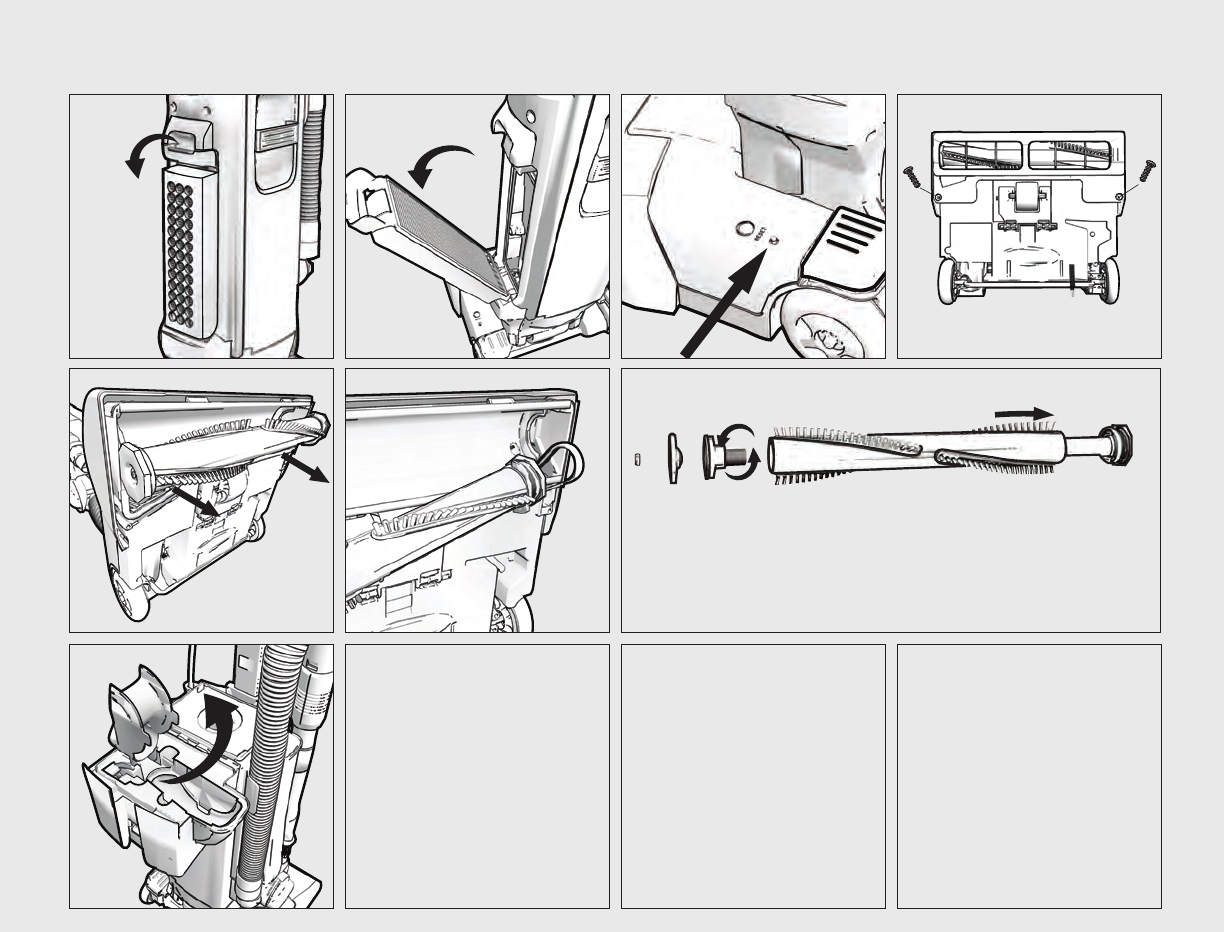
1. Pull down on the filter assembly latch to
release.
2. Pivot the lter away from the machine and
remove. Install new lter by aligning the
tabs at the bottom of the lter with the slots
on the exhaust area of the cleaner and snap
into place. Note: some lters are washable
and can be cleaned by rinsing the assembly
with warm water. Be sure the filters are
completely dry before installing back into the
cleaner. These lters are identied by the
word washable on the side of the frame.
BRUSH ROLL MOTOR
PROTECTION RESET
3. The cleaner will automatically shut off the brush roll
motor if the brush roll stalls. This will be indicated
by a red light on the base near the handle release.
To reset the motor, clear any obstruction to the
brush roll and press the reset switch.
HOW TO SERVICE THE BRUSH
ROLL (BELT CODE ZE107)
Caution: Belt pulleys can become hot during
normal use. To prevent burns, avoid touching the
belt pulley when servicing the drive belt.
4. Take out the two screws securing the sole
plate and remove.
5. Grasp both ends of the brush roll and pull
straight out of the machine.
6. Slide the pulley end of the brush roll through
the belt. Reverse the steps to reinstall the
brush roll making sure the end caps are
properly positioned the fully seat into the
base.
HOW TO REPLACE BRUSH STRIPS
7. From the non-pulley end, unscrew locknut
(A).and remove end cap (B). Grasp outer
sleeve and twist bearing retainer (C)
counterclockwise to remove. Pull outer
sleeve (D) off of remaining assembly. Pull
out worn brush strip (E) with pliers. Slide in
new brush strip of same length (rounded end
rst). Fit track on either side of the brush strip
into the brush roll slot. Replace the second
strip from opposite end of brush roll. Replace
shaft. Align indentation on bearing pulley
retainer (F) with brush strips and press outer
tube (D) into position. Screw bearing retainer
(C) into inner tube until tight. Reassemble the
remainder of brush roll, making sure it turns
freely, and secure into the base.
AIR PATH CLEAN-OUT
8. The cleaner is equipped with an air path cleanout,
located at the turn into the dust bag. To access,
open the dust bag cover and grasp the inlet
assembly at the air path opening. Pull up on the
hinged assembly to reveal the top of the air path.
Clean out any debris and snap the inlet assembly
back into place.
PRE-MOTOR FILTER
Note: Check the pre-motor lter located under the
dust bag. Check the lter each time the dust bag
is changed. Clean or replace as needed. Shake
lter to remove excess dust. If necessary, the
lter can be cleaned by vacuuming with another
cleaner or washing with mild detergent. Reinstall
lter after completely dry.
A
B
C
D
F
1. 2. 3. 4.
5. 6. 7.
8.


