


ABC
2524
You may well develop a personal affection to Trilobite and
appriciate its intelligence.To get the best from your Trilobite,
we recommend you consider following.
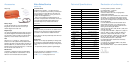
Charging (see also picture “Charging status”)
Check the battery indicator before vacuuming starts. Refer to
the lower, right picture.
A. Charge your Trilobite before vacuuming
B. You can commence vacuuming. But your Trilobite will need
to find the charger soon.
C.You don´t need a charger in the room to start vacuuming
Avoid interrupting the charging process. If unavoidable, pull the
machine away from the charger and press the On/Off button.
Vacuuming can also be started while Trilobite is still being
charged. If the power to the charger is interrupted for more
than 30 seconds during charging, and you have not manually
placed Trilobite in the charger, it will leave it, take a spin on the
floor and then connect with the charger again.
Move the furniture
Trilobite picks its way around furniture, whether freestanding
or placed flush against a wall. However, cleaning is both quicker
and more effective if you move the furniture slightly before it
is time to start cleaning. Of course, you do not need to move
heavy furniture such as sofas. On the other hand, chairs can be
conveniently placed on top of tables, a standard lamp can be
moved out of the way onto an armchair, loose rugs can be
shifted. But don’t complicate matters more than you need to!
Normally, all you need to do is to put Trilobite on the floor
and let it get on with the job of cleaning.
Loose objects
Trilobite cannot distinguish between dust, coins, rings and
expensive jewellery. Before starting Trilobite, be sure to put
away small, loose objects you do not want to lose.
Also make sure there are no cords or other objects on the floor
that may prevent Trilobite from moving freely in the room.
For your own safety
Before vacuuming, read “For your own safety” on page 22-23!
Preparations Before Use
Recharging
Push the Trilobite unit with its rear against the
battery charger’s contact plate. Press it in
securely. Keep it pressed in until you hear
an acknowledging signal (this may take a
few seconds). This is particularly important
if the batteries are entirely – or almost entirely
– discharged.
The battery
charger is placed
along a wall with a
free margin of 0.2
m to the right of
the charger.
Charging status
The battery indicator on Trilobite’s dis-
play shows the battery capacity during
vacuuming and charging.
An audible signals
sounds and the battery
symbol in the display
light when charging
commences. Trilobite
becomes fully charged
in about two hours at
which time “Ready”
lights in the display.
Battery indicator
Normal, Timer: Auto
Start vacuuming?
NOTE! Do not
place the
magnetic strip
at an angle of
less than 90°.
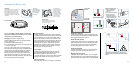
Affixing the magnetic strip
5. Clean the surface with the
enclosed cleaning pad.
Allow to dry.
6. Pull of the protective padding.
7. Affix the magnetic strip.
Warning! Credit cards, etc.
held in the immediate vicinity
may become demagnetised.
5.
6. 7.
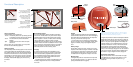
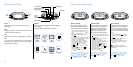
Rooms with a staircase
Trilobite cannot see staircases or other level differences.To pre-
vent it from falling down the stairs, block access to the staircase
with a magnetic strip as shown in picture 1.
Rooms with wall openings
Trilobite is able to vacuum rooms with wall openings or walls
placed at odd angles. However, this will take longer than usual.
It is a good idea to vacuum one room at a time and separate
the rooms using magnetic strips as shown in picture 2.
Rooms with doorsteps
Always fit magnetic strip on the floor in front of the doorstep
in the room you will be vacuuming. See picture 3 an 4.
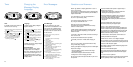
Magnetic strips and carpets
If the carpet has a pile depth of less than 15 mm, the magnetic
strip can be placed under it with maintained functionality. If the
strip is fitted on top of the carpet, be sure it is securely attached.
Always attach the magnetic strip on top of the step
(Figure 8) and never along its side (as shown in Figure 9
and 10).
8.
10.
9.
2. Room with
wall openings
1. Room with a
staircase
3. Rooms with doorsteps
4. Rooms with doorsteps