


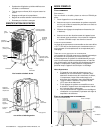

07-01583B 06-07 Copyright 2007 Dri-Eaz Products, Inc. 3
TEST THERMOSTAT:
1. Move the system switch from OFF to the HEAT position.
Press the ^ button on the keypad until the setpoint
temperature setting is a minimum of 3 degrees higher than
the current room temperature. The EB1400 should start
within several seconds.
2. The system switch in the OFF position. The EB1400
should stop within several seconds on normal single stage
heating or cooling systems. Note: On refrigeration
systems you must wait 5 minutes for the automatic
compressor short cycle protection period to expire, or
press the RESET button to bypass this feature for initial
testing purposes. Pressing the RESET button will erase
any user program settings.
3. Place the system switch in the COOL position.
4. Press the v button on the keypad until the setpoint
temperature is a minimum of 3 degrees lower than the
current room temperature. The cooling system should start
within several seconds.
5. Place the fan switch in the AUTO position when using the
EB1400.
VIEWING SET TEMPERATURE
1. Press and hold ^ or v button. The current setpoint
temperature will be displayed in the place of the current
room temperature, and the indicator SET will be displayed.
2. The display will return to normal operating mode when the
^ or v buttons are released. The SET indicator will turn off,
indicating that the current temperature shown in the
display is the room temperature. Continuing to hold the ^
or v button for 3 seconds or longer will allow the user to
change the current setpoint temperature (See Changing
Set Temperature, below).
CHANGING SET TEMPERATURE
1. Press and hold ^ or v button for 3 seconds. The entire
display will flash once and the SET indicator will be
flashing. Release the ^ or v button and press the ^ or v
button again as desired to adjust the set temperature.
2. The display will return to normal operating mode after 5
seconds.
3. The SET indicator will turn off in the display, indicating that
the current temperature shown in the display is the room
temperature.
HIGH TEMPERATURE SAFETY SWITCH
When the selector switch is set to HEAT, a software feature
automatically turns the unit off if the room temperature rises
above 93°F (34°C). If the temperature rises above 99°F
(37°C), the thermostat mechanically turns the unit off.
NON-VOLATILE MEMORY
In the event of a power failure, the non-volatile memory feature
of this unit allows all settings to be recovered. When AC power
is restored after an outage, all settings are retrieved from
memory and reinstated.
RESETTING THERMOSTAT
The Reset feature allows the user to completely reset the
thermostat to return to factory-set software settings.
1. To erase all entered settings, gently press RESET button
using a paper clip or a small pencil tip.
2. This will return all thermostat settings to their default values
and register all new manual switch settings for proper
operation.
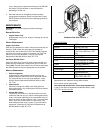
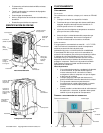
DUCTING INSTRUCTIONS FOR THE EB1400:
DUCT A: HEAT INLET
D
UCT B: HEAT OUTLET
D
UCT D: COLD OUTLET
• D
UCTING: The unit is ductable for directing
conditioned air or heat into specific spaces.
• D
UCTING SIZE: Use 8-inch diamater ducting and
secure with clamps on duct adapters.
• S
IDE DUCTING: When using duct on the side,
ducting should be run sideways out doors and
windows. Put unit in corner and duct up at an
angle into ceiling tiles (not directly up).
• R
IGID DUCTING: Duct A requires rigid ducting (not
layflat) attached by clamps.
APPLICATIONS (Visit the EB1400 VTC at):
http://www.dri-eaz.com/VTC/EB1400.html
• COOLING IMMEDIATE AREA: Cold air blowing from
Duct D (not ducted) will cool overall room.
• H
EATING AREA: Duct B outputs heat; ducting is
needed if ducting warm air outside room or to
focus heat in targeted area. If not ducted outside
the room then it will heat the immediate space.
• N
EUTRAL AIR CONDITIONING: For neutral air
conditioning duct both B (heat outlet) & A (heat
inlet) outside the structure.
• D
EHUMIDIFYING: Spot cool with dehumidification by
ducting outlet D. No ducting is needed to
dehumidify overall area.
• S
POT COOLING: For spot cooling point outlet D air
stream to specific area or duct it to spot cool.
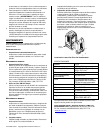
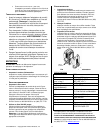
TRANSPORTING AND STORING
1. Before transporting, move Duct B ducting adapter to either
the front or back of the unit to prevent damage. Note: Do
not expose the thermostat to moisture and rain when
transporting in uncovered vehicles such as flatbed trucks.
2. Transport the unit on stairs or over rough surfaces upright
on the Unimover or hand truck and hold in place using
straps. WARNING! Take care when loading the unit on a
hand truck; the unit could tip over resulting in personal