


7
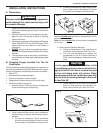
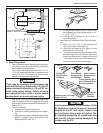
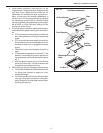
7. Install ceiling template by sliding lower duct over
upper duct. See FIG. 11.
If bolts are left loose there may not be an ad-
equate roof seal or if over tightened, damage
may occur to the air conditioner base or ceil-
ing template. Tighten to torque specifications
listed in this manual.
CAUTION
FIG. 11
Slide Lower Air
Discharge Duct
Over Upper Duct
Roof
Hold Ceiling Template With
One Hand And Install 3
Mounting Bolts Finger Tight
Air Conditioner
Return Air
Opening
8. Hold the ceiling template with one hand and with the
other, install the three 1/4" mounting bolts through
the template and into the base pan.
a. Finger-tighten the bolts and check alignment.
There should be an equal opening on each side
and the rear flange must be tight against the roof
opening.
b. EVENLY tighten the three bolts to a torque
of 40 to 50 inch pounds. This will compress
the roof gasket to approximately 1/2". The
bolts are self locking so over tightening is
not necessary.
G. Wiring The System
Disconnect 120 volt AC. Failure to follow these
instructions could create a shock hazard caus-
ing death or severe personal injury.
WARNING
!
Reach up into the return air opening and pull the re-
maining wires down.
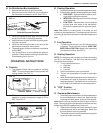
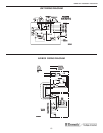
1. Connection of 120 VAC (refer to FIG. 12)
a. Route power supply line through Romex con-
nector into junction box. Tighten connector,
being careful not to pinch or short wires.
b. Connect white to white; black to black; and
green to green or bare copper wire using appro-
priate sized twist connectors.
c. Tape the twist wire connectors to the supply
wire to assure they don't vibrate off.
d. Push the wires into the box.
e. Install the cover onto the junction box.
f. Plug the electrical conduit from the upper unit
into the mating switch box connector. See FIG.
12.
FIG. 12
Route Power Supply
Through Romex Con-
nector
Plug Conduit
Into Switch
Box
Install
Cover
630025.331 Installation Instructions