


13
Problem Possible Cause Service Instructions
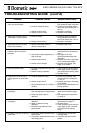
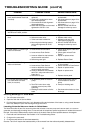
TROUBLESHOOTING GUIDE (cont’d)
12. Water does not stay in toilet
bowl (leaks between ush ball
and seal).
13. Toilet ushes in both ADD
WATER and FLUSH position.
14. Water leaks from toilet onto
oor.
15. Green OKAY TO FLUSH light
does not illuminate.
16. Red DO NOT FLUSH light
does not illuminate.
17. Flush ball opens and closes,
but waste does not leave
bowl (no vacuum).
a. Flush ball seal is worn and needs
replaced.
b. Flush ball is scratched or worn
and needs replaced.
c. Cam switch/ush ball alignment
needs adjustment.
d. Bolts that hold base to toilet need
tightened to 20-25 in.-lbs.
a. Defective circuit board.
a. Loose water line connection.
b. Defective water valve.
c. Toilet bowl seal is defective.
d. Mounting bolts holding base to
toilet need tightened to 20-25
in.-lbs.
a. Loose wire at circuit board.
b. Loose wire at Flush Switch.
c. Loose or defective wire between
vacuum switch and toilet.
d. Defective green light.
a. Loose wire at circuit board.
b. Loose wire at Flush Switch.
c. Loose or defective wire between
vacuum switch and toilet.
d. Loose or defective wire between
tank FULL relay and toilet circuit
board pin 8.
e. Defective red light.
a. No electrical power to vacuum
pump.
b. Tank FULL shut-down relay
prevents vacuum pump from
operating.
c. Blockage inside bottom of toilet
base.
a. See instructions on page 15 for
replacement.
b. See instructions on page 15 for
replacement.
c. See instructions on page 14 for
adjustment.
d. DO NOT OVERTIGHTEN or
damage to toilet may occur.
a. Replace circuit board.
a. Tighten water line connections.
b. Replace water valve.
c. Replace bowl seal. See
instructions on page 15.
d. DO NOT OVERTIGHTEN or
damage to toilet may occur.
a. Check wires at pins 3 and 6 of
circuit board.
b. Check green wire at Flush
Switch.
c. Repair or replace wires.
d. Replace Status Panel.
a. Check wires at pins 5, 7 and 8
of circuit board.
b. Check red wire at Flush Switch.
c. Repair or replace wires.
d. Repair or replace wire.
e. Replace status panel.
a. Check power wires, fuse or
circuit breaker to vacuum
pump.
b. Pump out holding tank.
c. See instructions below to clear
blockage.
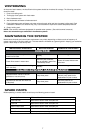
Clearing Blockage in Toilet Base
1. Turn off water to the toilet.
2. Open the ush ball in Service Mode.
3. Pull the foreign material from the 1-inch diameter orice at the bottom of the base or, using a small diameter
blunt rod, attempt to push the blockage through the orice.
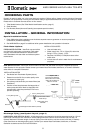
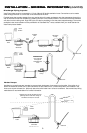
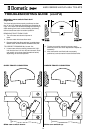
Locating Potential Vacuum Leaks in Toilet Base
The VacuFlush toilet is part of a vacuum system that includes a vacuum pump and vacuum tank, or a vacuum
generator and discharge plumbing lines. If a vacuum leak is suspected, special equipment will isolate the source of
the leak. If the toilet is determined to be the source of the leak, there are three possible areas to investigate:
1. Flush ball and ush ball seal. See Problem 12 in Troubleshooting Guide.
2. O-rings on the rotor shaft.
3. O-rings around bottom of toilet base assembly.
Sources 1 and 2 will require the base assembly to be removed from the toilet and partially disassembled.