


objects can contact exposed battery terminals.
For example, do not place battery in aprons, pockets,
tool boxes, product kit boxes, drawers, etc. with loose
nails, screws, keys, etc. without battery cap. Without
cap in place, battery could short circuit causing fire or
burns or damage to battery.
SAVE THESE INSTRUCTIONS FOR
FUTURE USE
Charging Procedure
Chargers require no adjustment and are designed to be as easy
as possible to operate. Simply place your battery pack into the
receptacle of a plugged in charger and it will automatically charge
the pack.
15 MINUTE CHARGER
1. Plug the charger into an appropriate AC power outlet. The
charger will beep twice, the red light will blink and go off.
2. Insert the battery pack into the charger, making sure the pack
is fully seated in the charger. The red light will blink and the
charger will beep once indicating the charging process has
started.
3. The battery pack will be fully charged in less than 15 minutes
under most conditions. This will be indicated by the red light
remaining ON and 3 beeps. The pack is fully charged and may
be used at this time or left in the charger.
Weak Battery Packs: (DW9115). The charger can also detect a
weak battery. Such batteries are still usable but should not be
expected to perform as much work. In such cases, about 10
seconds after battery insertion, the charger will beep rapidly 8
times to indicate a weak battery condition. The charger will then
go on to charge the battery to the highest capacity possible.
ONE HOUR CHARGERS
1. Plug the charger into an appropriate AC power outlet.
2. Insert the battery pack into the charger, making sure the pack
is fully seated in the charger. The red (charging) light will blink
continuously indicating that the charging process has started.
3. The completion of charge will be indicated by the red light
remaining ON continuously. The pack is fully charged and may
be used at this time or left in the charger.
Leaving the battery pack in the charger: When the red light
remains ON, the charger has switched to its "equalize charge"
mode which lasts approximately 4 hours, after which the charger
will switch to "maintenance charge" mode. The battery pack can
be removed at any time during these charge cycles, but will only
be fully charged if the red light is continuously ON. The charger
and battery pack can be left connected with the red light glowing
indefinitely. The charger will keep the battery pack fresh and fully
charged. A battery pack will slowly lose its charge when kept out
of the charger. If the battery pack has not been kept on
maintenance charge, it may need to be recharged before use. A
battery pack may also slowly lose its charge if left in a charger
that is not plugged into an appropriate AC source.
Trouble Indicators: These chargers are designed to detect
certain problems that can arise with battery packs which would be
indicated by the red light flashing at a fast rate (and continuous
beeping for DW9115, DW9107, DW9108). If this occurs, re-insert
battery pack. If problem persists, try a different battery pack to
determine if the charger is OK. If the new pack charges correctly,
then the original pack is defective and should be returned to a
service center for recycling. If the new battery pack elicits the
same trouble indication as the original, have charger tested at an
authorized service center.
PROBLEM POWER LINE (DW9107)
When these chargers are used with some portable power sources
such as generators or sources that convert DC to AC, the
chargers may temporarily suspend operation, flashing the red
light with two fast blinks followed by a pause. This indicates
the power source is out of limits.
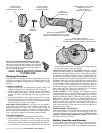
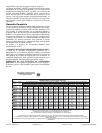
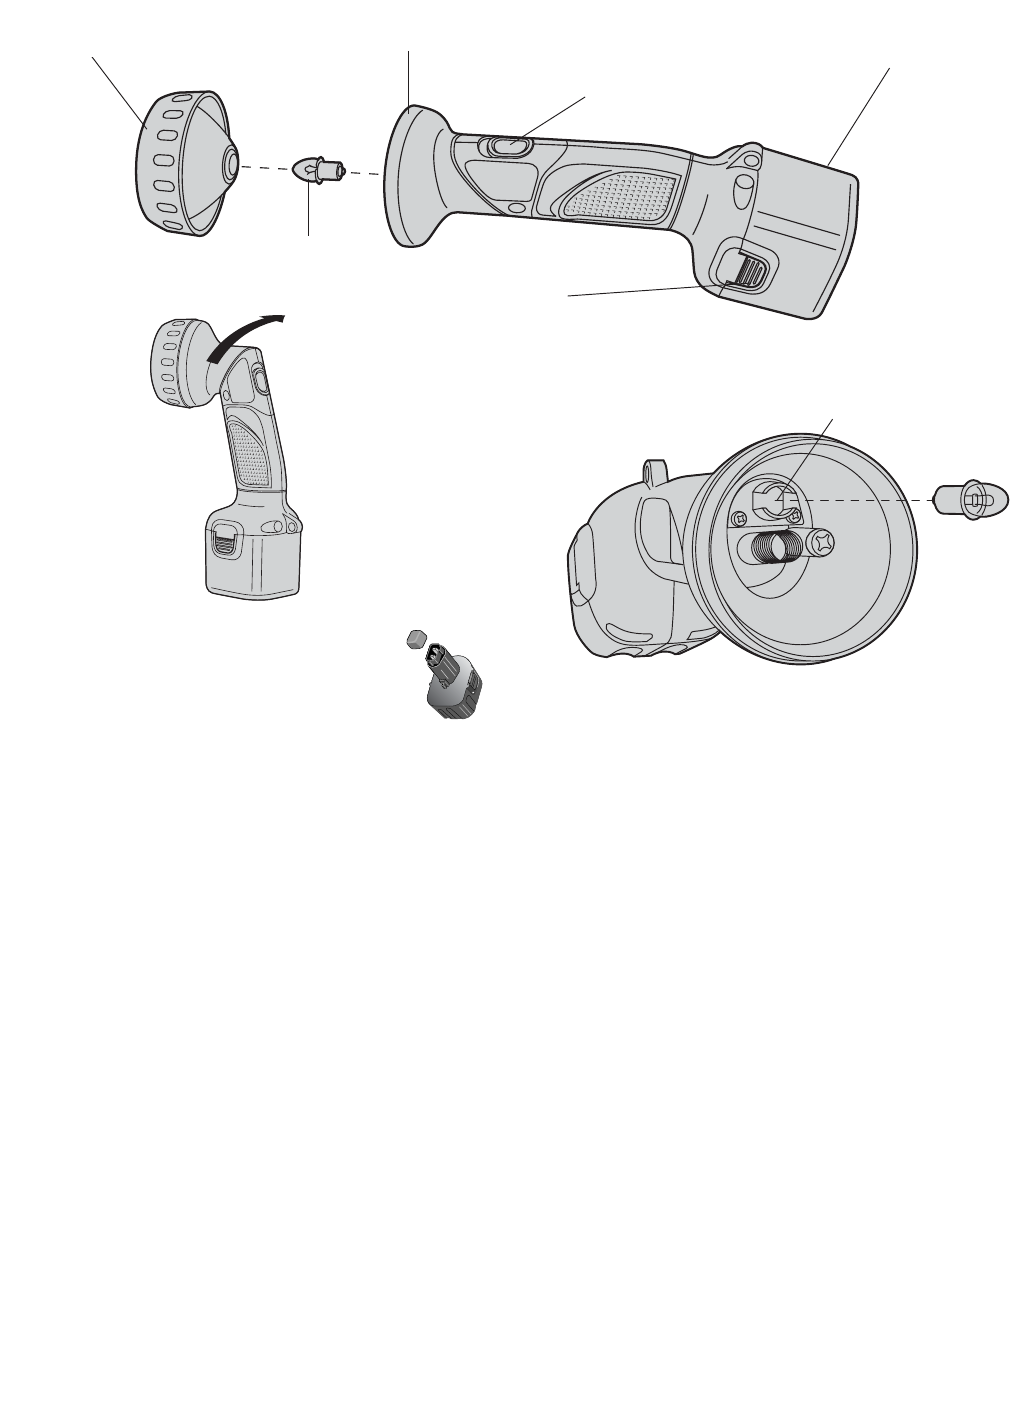
Battery Insertion and Removal
To insert the power pack into your flashlight, slide it into the end of
the light until it snaps into place. To remove the power pack,
depress the release buttons shown and withdraw the power pack.
If you have any questions, call 1-800-4-DEWALT (1-800-433-9258)
FIG. 1
FIG. 3
LENS HOLDER
PORTE-LENTILLE
SUJETADOR DE LA LENTE
BULB
AMPOULE
BOMBILLA
BATTERY RELEASE BUTTON
BOUTON DE DÉGAGEMENT DE LA PILE
BOTON DE LIBERACION DE LA BATERIA
SPARE BULB STORAGE
RANGEMENT DE L’AMPOULE DE RECHANGE
COMPARTIMIENTO PARA BOMBILLA DE REPUESTO
POWER PACK (NOT INCLUDED)
ENSEMBLE DE PILES
(NON COMPRIS)
BATERIA (NO INCLUIDA)
PIVOTING HEAD
TÊTE PIVOTANTE
CABEZA GIRATORIA
SWITCH
INTERRUPTEUR
INTERRUPTOR
FIG. 2