


www.desatech.com
116646-01A
24
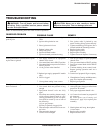
OPERATING FIREPLACE
Installing Logs, Lava Rock and Glowing Embers (Cont.)
For Your Safety Read Before Lighting
Lighting Instructions
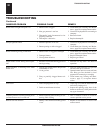
OPERATING FIREPLACE
FOR YOUR SAFETY
READ BEFORE LIGHTING
WARNING: If you do not follow these instructions
exactly, a fire or explosion may result causing property
damage, personal injury or loss of life.
A. This appliance has a pilot which must be lighted by hand.
When lighting the pilot, follow these instructions exactly.
B. BEFORE LIGHTING smell all around the appliance area
for gas. Be sure to smell next to the floor because some gas
is heavier than air and will settle on the floor.
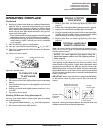
WHAT TO DO IF YOU SMELL GAS
• Do not try to light any appliance.
• Do not touch any electric switch; do not use any phone
in your building.
• Immediately call your gas supplier from a neighbor's
phone. Follow the gas supplier's instructions.
C. Use only your hand to push in or turn the gas control knob.
Never use tools. If the knob will not push in or turn by hand,
don't try to repair it, call a qualified service technician. Force
or attempted repair may result in a fire or explosion.
D. Do not use this appliance if any part has been under water.
Immediately call a qualified service technician to inspect
the appliance and to replace any part of the control system
and any gas control which has been under water.
LIGHTING
INSTRUCTIONS
1. STOP! Read the safety information above.
2. Open lower louver panel.
3. Turn off all electric power to the fireplace.
4. Push in gas control knob slightly and turn clockwise
to “OFF”.
5. Wait five (5) minutes to clear out any gas. Then smell for
gas, including near the floor. If you smell gas, STOP! Follow
“B” in the safety information above. If you don't smell gas,
go to the next step.
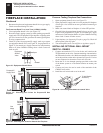
6. The pilot is located by the main burner and should not
require accessing for lighting.
7. Turn gas control knob counterclockwise
to “PILOT”
(see Figure 51, page 25).
5
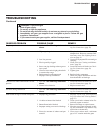
6
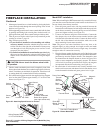
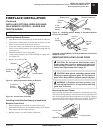
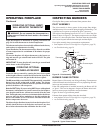
Figure 49 - Installing Logs No. 5 and No. 6
FIREPLACE INSTALLATION
Continued
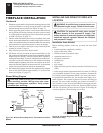
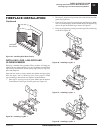
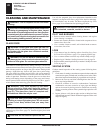
Ember Material
Figure 50 - Placing Ember Material on Burner
5. Place log #5 (base log) onto the front left part of the grate
making sure the notches fit over the prongs of the grate). See
Figure 49.
6. Place log #6 (left log) onto two pins on the left side of back
and front log. See Figure 49.
7. Place lava rock along sides and front of firebox bottom in areas
that are visible only. It is not necessary to use all of the lava
rock provided.
8. Pull ember material apart into pieces no larger than a dime.
Place these pieces loosely and sparingly directly onto the ex-
posed section of the front burner and along the space between
the burner and grate prongs (see Figure 50). This will create
the glowing ember appearance as the flame touches the ember
material. Do not block air slots by using too much ember
material in one area. It is not necessary to use all of the ember
material provided.
9. Close glass door, lock door latches, replace screen and close
louvers (see steps 5 and 7 of Removing Glass Door, page 22).