


www.desatech.com
111921-01E 21
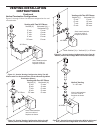
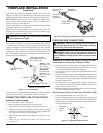
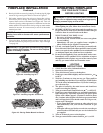
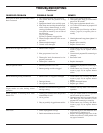
Figure 46 - Installing Log No. 7
FIREPLACE INSTALLATION
Continued
7
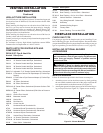
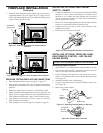
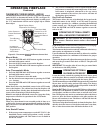
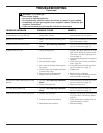
Figure 47 - Installing Logs No. 8 and No. 9
8
9
6. Rest log #8 (left crossover log) onto log #3 and rest log #9 (right
crossover log) onto logs #4 and #5 as shown in Figure 47.
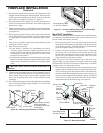
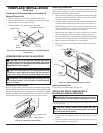
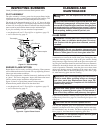
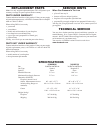
7. Pull ember material apart into pieces no larger than a dime.
Place these pieces loosely and sparingly directly onto the
exposed front section of the burner (see Figure 48). This will
create the glowing ember appearance as the ame touches the
ember material. Do not block air slots by using too much ember
material in one area. It is not necessary to use all of the ember
material provided.
problems.
8. Close glass door, lock door latches, replace screen, and close
louvers (see Removing/Replacing Glass Door, steps 5 through
7 on page 19).
WARNING: The glass door must be securely in place
Figure 48 - Placing Ember Material on Burner
Ember Material
OPERATING FIREPLACE
FOR YOUR SAFETY READ
BEFORE LIGHTING
WARNING: If you do not follow these instructions
damage, personal injury or loss of life.
A. This appliance has a pilot which must be lighted by hand.
When lighting the pilot, follow these instructions exactly.
B. BEFORE LIGHTING smell all around the appliance area
for gas. Be sure to smell next to the oor because some gas
is heavier than air and will settle on the oor.
WHAT TO DO IF YOU SMELL GAS
• Do not try to light any appliance.
• Do not touch any electric switch; do not use any phone
in your building.
• Immediately call your gas supplier from a neighbor's
phone. Follow the gas supplier's instructions.
C. Use only your hand to push in or turn the gas control knob.
Never use tools. If the knob will not push in or turn by hand,
don't try to repair it, call a qualied service technician. Force
or attempted repair may result in a re or explosion.
D. Do not use this appliance if any part has been under water.
Immediately call a qualied service technician to inspect
the appliance and to replace any part of the control system
and any gas control which has been under water.
LIGHTING
1. STOP! Read the safety information above.
2. Open lower louver panel.
3. Turn off all electric power to the replace.
4. Push in gas control knob slightly and turn clockwise
to OFF.
5. Wait ve (5) minutes to clear out any gas. Then smell for
gas, including near the oor. If you smell gas, STOP! Follow
“B” in the safety information above. If you don't smell gas,
go to the next step.
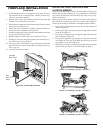
6. The pilot is located by the main burner and should not
require accessing for lighting.
7. Turn gas control knob counterclockwise to PILOT.
8. Push in gas control knob all the way and hold. Immediately
light the pilot by repeatedly depressing the piezo spark
ignitor until a ame appears. Continue to hold for about
one (1) minute after the pilot is lit. Release gas control knob
and it will pop back. Pilot should remain lit. If it goes out,
repeat steps 5 through 8.
• If gas control knob does not pop up when released, stop
and immediately call your service technician or gas
supplier.
• If the pilot will not stay lit after several tries, turn the gas
control knob to OFF and call your service technician or
gas supplier.
9. Turn on all electric power to the replace.
10. Turn gas control knob counterclockwise to ON.