


www.desatech.com
122272-01C16
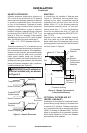
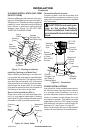
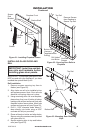
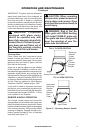
Figure 24 - Installing Doors
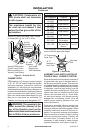
Figure 25 - Adjusting Bi-Fold Doors
INSTALLATION
Continued
Bottom
Retaining
Clip
Slide Top
Pin Into Top
Retaining Clip
Spring Clip
Side Front
Face
Partially
Opened
Door
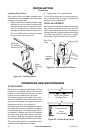
OPERATION AND MAINTENANCE
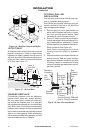
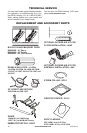
GLASS DOORS
Glass doors are optional with replace. When
replace is in operation, doors must be fully
opened or fully closed position only or a re
hazard may be created (see Figure 26).
A replace equipped with glass doors oper-
ates much differently than a replace with an
open front. A replace with glass doors has a
limited amount of air for combustion.
Excessive heat within the replace can result if
too large a re is built or if combustion air gate is
not completely open. The following tips should
be followed to assure that both the replace
and glass door retain their beauty and func-
tion properly. Both the ue damper and glass
doors must be fully opened before starting re.
This will provide sufcient combustion air and
maintain safe temperatures in rebox.
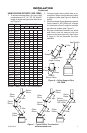
Figure 26 - Bi-Fold Glass Doors
Doors Fully Closed
Fireplace Front
Fireplace Front
Doors
Fully Opened
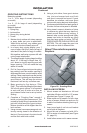
Installing Glass Doors
After spring clips have been installed some
adjustments may be needed. Install the doors
using the following steps:
1. With bi-fold doors completely folded, insert
bottom pivot pin into bottom retaining clip
located at far left and far right side of bot-
tom rail. Swing door to vertical position
making sure top pins slide into top door rail.
Door is installed when top door pin snaps
into spring clip (see Figure 24).
2. Repeat step 1 for remaining door.
If you nd the doors do not close properly or
do not appear level or straight, proceed with
section on door adjustment.
DOOR ADJUSTMENT
Remove doors and slightly loosen upper spring
clips. Replace and fully close doors. Use 1/8"
shims (any material) to level doors. Once proper
setting is achieved, carefully open doors enough
to access top retaining clips with a phillips
screwdriver. Tighten screws. See Figure 25.