


www.desatech.com
120927-54B 9
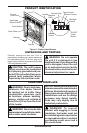
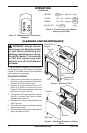
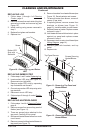
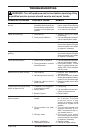
Figure 10 - Removing Log and Ember
LED
Log
Ember LED
Strip with
Standoffs
REPLACING LOG
1. Follow steps 1 through 4 of Cleaning
Firebox, page 8.
2. Remove screws from each side of log that
secure log to sides and remove log (see
Figure 10).
3. Install new log using screws removed in
step 2.
4. Replace front glass and brackets.
5. Replace trim.
CLEANING AND MAINTENANCE
Continued
REPLACING EMBER STRIP
1. Follow steps 1 and 2 under Replacing Log.
2. Locate ember LED strip (see Figure 10).
Disconnect wire (right side).
3. Remove ember LED strip by squeezing
top of standoffs and discard.
4. Connect new ember LED strip using exist-
ing standoffs.
5. Reconnect wire to LED strip.
6. Follow steps 3 through 5 under Replac-
ing Log.
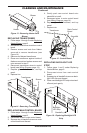
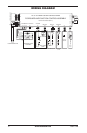
REPLACING HEATER/BLOWER
1. Follow steps 1 and 4 of Cleaning Firebox,
page 8.
2. Remove screws from around top panel of
rebox (see Figure 11).
3. There are several wires attached to the
top panel. Carefully lift top panel.
4. Disconnect heater/blower wires from main
circuit board.
5. Remove screws holding heater/blower to
top panel (see Figure 11).
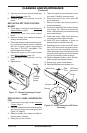
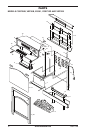
6. Remove brackets from heater/blower (see
Figure 12). Save brackets and screws.
7. To remove heater from blower, remove 4
screws (2 per side).
8. If replacing blower, remove screws from
brackets on blower (see Figure 13,
page 10). Install brackets to new blower.
9. Replace blower or heater. Replace screws
removed in step 7.
10. Hold heater/blower with brackets in place
against top panel and replace screws
removed in step 5.
11. Reconnect wires to main circuit board (see
Wiring Diagram, page 14).
12. Replace glass with brackets, and top
panel.
13. Replace trim.
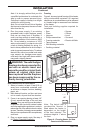
Figure 11 - Removing Top Panel and
Heater/Blower
Top Panel Screws
Screws Securing
Heater/Blower
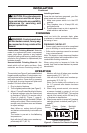
Figure 12 - Removing Brackets from
Heater/Blower
Brackets
Screw