


www.desatech.com
56131-F 11
VENTING INSTALLATION
INSTRUCTIONS
WARNING: Read all instruc-
Failure to do so could result in
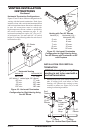
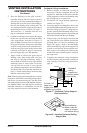
WARNING: Seal all connec-
silicone every time a vent con-
sealant to the male end of the
-
seal any connections after main-
NOTICE: Failure to follow these in-
NOTICE: Do not seal termination
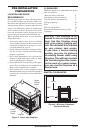
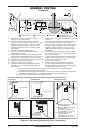
INSTALLATION PRECAUTIONS
Consult local building codes before beginning the
installation. The installer must make sure to select
the proper vent system for installation. Before
installing vent kit, the installer must read this
replace manual and vent kit instructions.
Only a qualied service person should install
venting system. The installer must follow these
safety rules:
• Wear gloves and safety glasses for protection
• Use extreme caution when using ladders or
when on roof tops
• Be aware of electrical wiring locations in walls
and ceilings
The following actions will void the warranty on
your venting system:
• Installation of any damaged venting component
• Unauthorized modication of the venting system
• Installation of any component part not manu-
factured or approved by DESA
• Installation other than as instructed by these
instructions
-
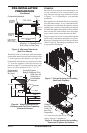
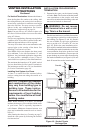
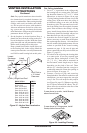
WARNING: Horizontal sec-
a minimum clearance of 2" from
-
Vertical sections of this system
-
INSTALLATION PLANNING
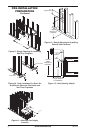
There are two basic types of direct-vent installation:
• Horizontal Termination
• Vertical Termination
It is important to select the proper length of vent
pipe for the type of termination you choose. It is
also important to note the wall thickness.
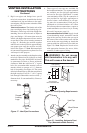
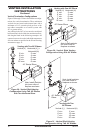
For Horizontal Termination: Select the amount
of vertical rise desired. The horizontal run of
venting must have 1/4" rise for every 12" of run
towards the termination.
WARNING: Never run the
vent downward as this may
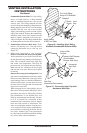
You may use one or two 90° elbows in this vent
conguration. See Horizontal Termination Con-
gurations on page 15.