


www.desatech.com
118994-01C 5
ASSEMBLY
Estimated assembly time: 45 minutes
Tools required:
• #2 Phillips screwdriver
• 9/16" and 5/16" Open end wrenches
Hardware packet provided with heater may
contain more parts than needed for heater
assembly. Parts are referenced by designated
letter throughout assembly instructions. Hard-
ware packet contains the following (quantity
used in parenthesis):
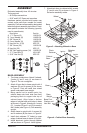
Description Part No.
A 1
1
/
2
" Screw (8) 119619-01
B 7 mm Washer (8) 119600-04
C 5/8" Screw (9) 119619-03
D 5 mm Washer (9) 119600-02
E Hex Nut No. 10 (9) NPC-3C
F 3/8" Screw (20) 119619-06
G Hex Nut (20) NPC-1C
H 3/8" Self tapping screw (34) 119620-02
I 2
1
/
4
" Hex Bolt (2) HC4-18C
J 5/16" Hex Nut (2) NPC-5C
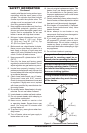
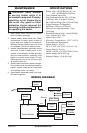
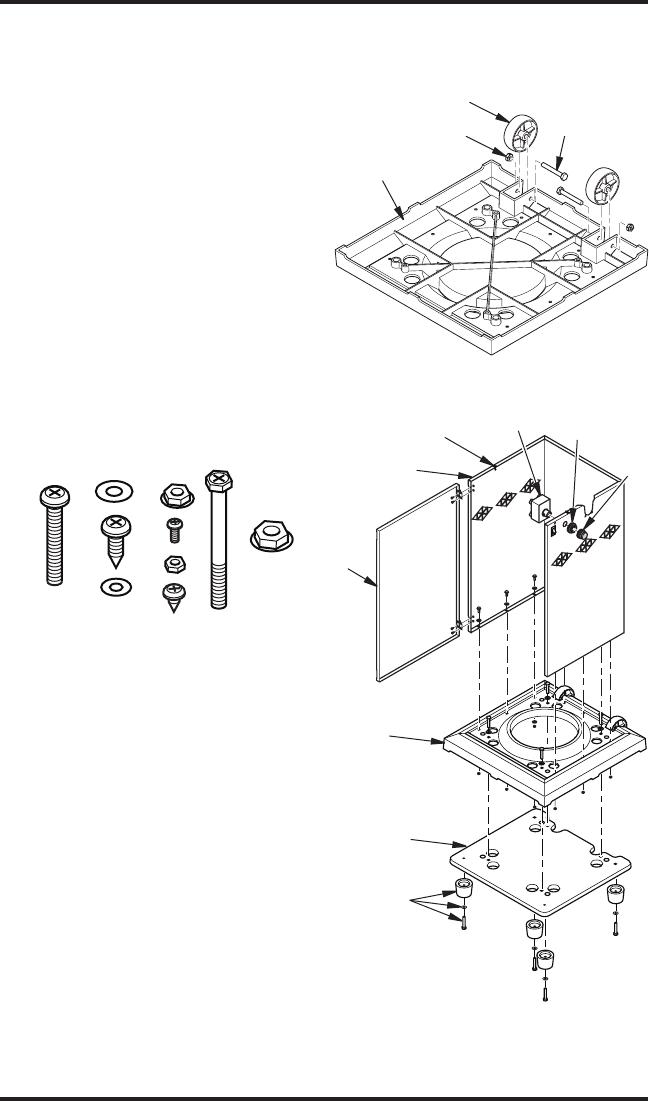
Figure 4 - Cabinet Base Assembly
Cabinet
Base
Tank
Door
Base
Ignitor
Retainer
Ring
Ignitor
Cap
BASE ASSEMBLY
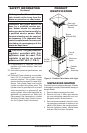
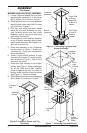
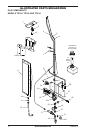
1. Turn base upside down. Attach 2 wheels,
2 axles (I) and 2 nuts (J) as shown in
Figure 3. Do not overtighten.
2. Attach 4 base feet to base weight with 4
washers (B) and 4 screws (A) as shown
in Figure 4. Feet will install over raised
areas underneath base weight.
3. Being careful not to scratch paint, lay
cabinet base onto back side (use foam
packaging block to support rear top of
cabinet base). Align holes in bottom
edges of cabinet base with holes in base
as shown in Figure 4. Attach with 1 screw
(C), 1 washer (D) and 1 nut (E) for each of
the 9 holes (see Figure 4). Set assembly
upright.
4. Attach base to weight with 4 screws (A)
and 4 washers (B) as shown in Figure 4.
5.
Install chain retainers (“S” hooks) to upper
edges of cabinet base as shown in Figure 4.
6. Install electronic ignitor through cabinet
wall as shown in Figure 4. Hand tighten.
A
F
H
B
J
C
D
E
G
I
Base
Weight
Base Foot,
Washer and
Hex Bolt
Figure 3 - Attaching Wheels to Base
Base
Wheel
Nut
Axle
7. Attach tank door to cabinet with 4 screws
(F) and 4 nuts (G) as shown in Figure 4.
Set entire assembly aside.
Chain
Retainer