


107304-01D
For more information, visit www.desatech.com
For more information, visit www.desatech.com
27
27
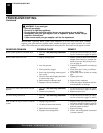
1. After lighting, let pilot flame burn for about one minute.
Turn gas control knob on the control valve to ON position.
Turn variable control knob anywhere between HI and LO.
Slide the selector switch to the REMOTE position.
Note:
The burners may light if hand-held remote ON button was
on when selector switch was last turned off. You can now
turn the burners on and off with either optional hand-held
remote control unit.
IMPORTANT:
Do not leave the selector switch in the REMOTE
position when the pilot is not lit. This will drain the battery.
IMPORTANT:
Be sure to press the ON/OFF buttons on the
hand-held remote control unit for up to 3 seconds to assure
proper operation.
GHRC Series Operation:
2a. Press the ON/OFF button to turn the burners on and off.
When turning burners off, the pilot will remain lit.
OPTIONAL REMOTE
OPERATION
Note:
All remote control accessories must be purchased sepa-
rately (See Accessories on page 38). Follow instructions in-
cluded with the remote control.
Thermostat Control Operation
(Optional GHRCTA Only) The thermostat control setting on the
remote control unit can be set to any comfort level between
WARMER and COOLER. The burners will turn on and off
automatically to maintain the comfort level you select. The ideal
comfort setting will vary by household depending upon the amount
of space to be heated, the output of the central heating system, etc.
NOTICE: You must light the pilot before using the
hand-held remote control unit. See
Lighting Instruc-
tions,
page 26.
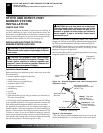
OPERATING STOVE WITH
BURNER SYSTEM
Continued
GHRCTA Series Operation:
2b. Press the AUTO/ON/OFF button on the hand-held remote
control (see Figure 62). The lights to the left of the button
will show AUTO, ON, or OFF.
• In the ON mode, the burners will ignite. The heater is in
manual mode when ON is lit.
• In the AUTO mode, the thermostat in the hand-held re-
mote unit controls the room temperature. To increase the
room temperature, press the top arrow of the TEMP but-
ton. To lower the room temperature, press the bottom ar-
row of the TEMP button. At higher settings the heater
will run longer.
IMPORTANT:
This remote control has been specially en-
gineered to take an air temperature sample every 5.5 min-
utes in the auto mode. It will not respond immediately to
the temperature setting being turned up or down.
IMPORTANT:
The hand-held remote control unit must
be near the heater. Do not keep the hand-held remote
control unit too close to the heater. The thermostat on
the hand-held remote control unit will heat up too quickly
and turn the heater off.
3. To turn the burner off, press the AUTO/ON/OFF button un-
til OFF lights. The pilot will remain lit.
IMPORTANT:
To turn the pilot off, manually turn the con-
trol knob on the heater to the OFF position.
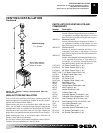
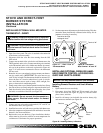
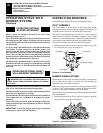
Figure 61 - Setting the Selector Switch, Gas Control Knob, and
Variable Control Knob for Remote Operation
HI
LO
IN
OUT
Selector Switch in Remote
Position (Optional Remote
Control)
Variable
Control Knob
Gas Control Knob
in On Position
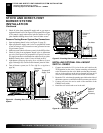
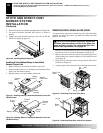
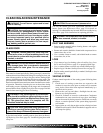
Figure 62 - Hand-Held Thermostat Remote Control Unit
Selections (GHRCTA Only)
Shows Temperature
Setting
The Log Heater will
Automatically Cycle
between Pilot and the
Heat Setting that has
been Selected
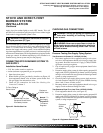
MANUAL LIGHTING
PROCEDURE
1. Remove glass door (see Removing/Replacing Glass Door,
page 24).
2. Follow steps 1 through 8 under Lighting Instructions, page 26.
3. Depress gas control knob and light pilot with match.
4. Keep gas control knob pressed in for 30 seconds after lighting
pilot. After 30 seconds, release gas control knob. Now follow
steps 10 through 14 under Lighting Instructions, page 26.
5. Replace glass door (see Removing/Replacing Glass Door,
page 24).
Increases Room
Temperature in
AUTO Mode
Decreases Room
Temperature in
AUTO Mode
Turns Burner On
or Off and Allows
You to Choose
the Auto Setting
OPERATING STOVE AND BURNER SYSTEM
Manual Lighting Procedure
Optional Remote Operation