


110373-01A
For more information, visit www.desatech.com
For more information, visit www.desatech.com
6
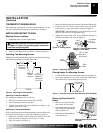
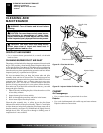
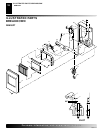
Propane/LP
Tank
Propane/LP
Supply
Valve
Regulator
Hose To
Heater
Fuel Gas
Fitting
Figure 10 - Regulator Position
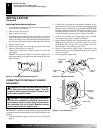
Figure 11 - Gas Connection
Heater
Cabinet
Pressure
Regulator
Elbow
Hose To
Regulator
Hose Fitting
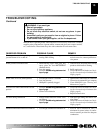
INSTALLATION
Installing Heater To Wall (Cont.)
Connecting to Portable Cylinder Gas Supply
INSTALLATION
Continued
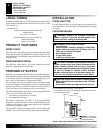
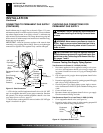
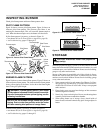
Installing Bottom Mounting Screw
1. Locate bottom mounting hole. This hole is near bottom on back
panel of heater (see Figure 9).
2. Mark screw location on wall.
3. Remove heater from wall.
4. If installing bottom mounting screw into hollow or solid wall,
install wall anchor. Follow steps 1 through 5 under Attaching To
Wall Anchor Method, page 5. If installing bottom mounting screw
into wall stud, drill hole at marked location using 9/64" drill bit.
5. Replace heater on wall.
6. Insert bottom anchor screw through back panel into bottom
anchor or drilled hole (see Figure 9).
7. Tighten screw until heater is firmly secured to wall. Do not
over tighten.
Note:
Do not replace front panel at this time. Replace front
panel after making gas connections and checking for leaks (see
pages 9 and 10).
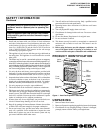
WARNING: Review and understand the warnings
in the
Safety Information
section, page 2. They are
needed to safely operate this heater. Follow all local
codes when using this heater.
IMPORTANT: You must use a propane/LP gas supply cylinder that
is compatible with the connection device provided with the hose and
regulator.
1. Provide propane/LP supply system (see Propane/LP Supply,
page 4).
WARNING: Test all gas piping and connections
for leaks after installation or servicing. Never use an
open flame to check for a leak. Apply a noncorrosive
leak detection fluid to all joints. Bubbles forming
show a leak. Correct all leaks at once.
CONNECTING TO PORTABLE CYLINDER
GAS SUPPLY
Figure 9 - Installing Bottom Mounting Screw
2. Connect fuel gas fitting on hose/regulator assembly to pro-
pane/LP tank(s). Turn fuel gas fitting counterclockwise into
threads on tank. Tighten firmly using a wrench.
IMPORTANT:
Position regulator so that hose leaving the regulator is in a
horizontal position (see Figure 10). This places the regulator
vent in the proper position to protect it from the weather.
3. Connect hose to heater inlet. Tighten firmly using a wrench.
You must use the regulator supplied with heater.
4. Open propane/LP supply valve on propane/LP tank(s) slowly.
Note:
If not opened slowly, excess-flow check valve on pro-
pane/LP tank may stop gas flow. If this happens, close pro-
pane/LP supply valve and open again slowly.
5. Check all connections for leaks. Apply a noncorrosive leak
detection fluid to gas joints. Bubbles forming show a leak that
must be corrected.
6. Close propane/LP supply valve.