


114418-01A
For more information, visit www.desatech.com
For more information, visit www.desatech.com
3
3
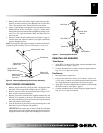
Figure 6 - Removing/Replacing Rear Burner Assembly
Tube Burner
Screw (5/16" Hex)
Tube Burner Orifice
(18mm Hex)
Apply Thread
Sealant Here Only
Elbow (7/8"
Across Flats)
Aluminum Tube/
Flare Fitting
(3/4" Hex)
3. Remove NG orifice from elbow. Apply a light amount of pro-
pane/LP resistant sealant to short threaded end of LP orifice
(104, #59) supplied in kit. Thread LP orifice into elbow.
4. Apply a light amount of propane/LP resistant sealant to long
threaded end of orifice (see Figure 5, page 2). Thread elbow
fitting with orifice into burner inlet and tighten by turning clock-
wise. Use a 7/8" open end wrench. Make sure flare end of el-
bow faces left.
5. Locate air shutter at end of tube burner (see Figure 5, page 2).
Loosen screw and adjust air shutter to full open (maximum)
position. Retighten screw.
Note:
Do not replace tube burner assembly in firebox at this time.
Convert the pilot assembly first (see Pilot Orifice Conversion).
PILOT ORIFICE CONVERSION
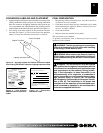
1. Remove the pilot hood by pulling up until it disengages from
the barrel. Do not remove the retainer clip (see Figure 7).
2. Remove the pilot orifice from inside the barrel using a 5/32"
allen wrench to unscrew the orifice.
3. Replace pilot orifice with LP orifice supplied with this kit. The
number 30 is stamped on the sleeve for identification. Insert
the small end of the new pilot orifice into the barrel and thread
until tight with the allen wrench.
4. Line up the notch on pilot hood to the positioning tab on the
barrel receiver and snap back into position.
IMPORTANT:
Be careful not to bend or kink the aluminum
tubing during conversion. Make sure the pilot hood and orifice
are properly mated and aligned after finishing this conversion.
Figure 7 - Converting Pilot Orifice
Pilot Hood
Pilot Orifice
Barrel Clip
Pilot Bracket
5/32" Allen
Wrench
REINSTALLING BURNERS
Tube Burner
1. Apply RTV silicone to orifice where it passes through the fire-
box bottom (see Figure 5, page 2).
2. Connect aluminum tube to elbow fitting and tighten flare fit-
ting. Use a 3/4" open end wrench.
Pan Burner
1. Rest pan burner on grate base.
2. Using screws removed in step 3 of Pan Burner Orifice Con-
version, page 2, reattach two small burner hold down brackets
on rear of pan burner to grate base. See Figure 4, page 2.
3. Apply RTV silicone to adapter fitting where it passes through
the firebox bottom (see Figure 3, page 2).
4. Connect aluminum tube to elbow fitting and tighten flare fit-
ting. Use a 3/4" open end wrench.