


108794
15
15
For more information, visit www.desatech.com
For more information, visit www.desatech.com
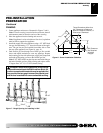
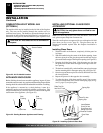
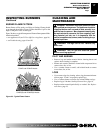
8. Close both doors until evenly joined at the middle and note the
gap at the outer edges of the face.
9. Reopen one door at a time and retighten the upper and lower
hold-down screws.
10. Repeat the process until both doors are evenly joined, spaced
and working freely.
CAUTION: The glass panels become very hot
while the appliance is operating. Do not attempt to
adjust or clean the glass doors until the appliance
has fully cooled.
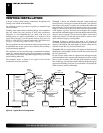
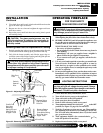
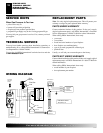
Removing Glass Doors for Replacement or Cleaning
1. Partially open the door and press up on the upper spring clip with
a screw driver until the outer top pivot pin is free of the clip.
2. Fully fold the frame assembly and slide the upper edge to-
wards the center of the firebox opening until the guide pins are
free of the frame rail (see Figure 32).
CAUTION: Always operate the appliance with the
doors either fully opened or fully closed. Operating
the appliance with the doors partially open can result
in improper venting of flue products.
Figure 31 - Adjusting Glass Doors
Spring Clip
Hold-Down
Screw
Side Front
Face
Partially
Opened
Door
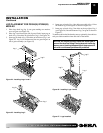
Figure 32 - Removing Glass Doors
Spring Clip
Depress Spring
Clip to Release
Pivot Pin
Remove Bottom
Pin From Pivot
Plate While Sliding
Door Out of the
Upper Track
Pivot Plate
Fold Bi-Fold
Door After
Releasing
Spring Clip and
Slide Door Out
of Upper Track
INSTALLATION
Continued
INSTALLATION
Installing Optional Glass Door Accessory (Cont.)
OPERATION
For Your Safety Read Before Lighting
Lighting Instructions
OPERATING FIREPLACE
FOR YOUR SAFETY
READ BEFORE LIGHTING
WARNING: If you do not follow these instructions
exactly, a fire or explosion may result causing prop-
erty damage, personal injury or loss of life.
A. This appliance has a pilot which must be lighted by hand.
When lighting the pilot, follow these instructions exactly.
B. BEFORE LIGHTING smell all around the appliance area
for gas. Be sure to smell next to the floor because some gas
is heavier than air and will settle on the floor.
WHAT TO DO IF YOU SMELL GAS
• Do not try to light any appliance.
• Do not touch any electric switch; do not use any phone in
your building.
• Immediately call your gas supplier from a neighbor’s
phone. Follow the gas supplier’s instructions.
• If you cannot reach your gas supplier, call the fire de-
partment.
C. Use only your hand to push in or turn the gas control knob.
Never use tools. If the knob will not push in or turn by
hand, don’t try to repair it, call a qualified service techni-
cian or gas supplier. Force or attempted repair may result
in a fire or explosion.
D. Do not use this appliance if any part has been under water.
Immediately call a qualified service technician to inspect
the appliance and to replace any part of the control system
and any gas control which has been under water.
LIGHTING INSTRUCTIONS
1. STOP! Read the safety information, above.
2. Turn off all electric power to the appliance.
3. Turn wall switch to the OFF position.
4. Fully open glass doors if installed.
5. Remove front refractory brick access panel.
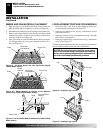
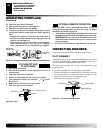
6. Turn equipment shutoff valve clockwise
Clockwise
to the OFF
position (see Figure 33, page 16). Do not force.
7. Wait five (5) minutes to clear out any gas. Then smell for
gas, including near the floor. If you smell gas, STOP! Fol-
low “B” in the safety information, above. If you don’t smell
gas, go to the next step.
8. Turn equipment shutoff valve counterclockwise
C-clockwise
to the ON position. Do not force.
9. Replace front refractory brick access panel.
NOTICE: During initial operation of new heater, burn-
ing logs will give off a paper-burning smell. Orange
flame will also be present. Open damper or window to
vent smell. This will only last a few hours.