


www.desatech.com
118621-01B14
INSTALLATION
Continued
PRESSURE TESTING HEATER GAS
CONNECTIONS
1. Open equipment shutoff valve (see
Figure 18, page 13).
2. For natural gas open main gas valve
located on or near gas meter. For pro-
pane/LP gas open propane/LP supply
tank valve.
3. Make sure control knob of heater is in the
OFF position.
4. Check all joints from equipment shutoff
valve to thermostat gas valve (see Figure
19 or 20). Apply a noncorrosive leak de-
tection uid to all joints. Bubbles forming
show a leak.
5. Correct all leaks at once.
6. Light heater (see Operating Heater, page
15). Check all other internal joints for
leaks.
7. Turn off heater (see To Turn Off Gas to
Appliance, page 15).
8. Replace front panel.
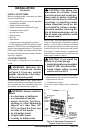
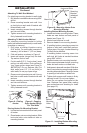
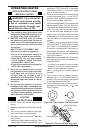
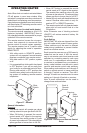
Figure 20 - Checking Gas Joints for
Propane/LP Gas
Equipment
Shutoff
Valve
Propane/LP
Supply Tank
Gas Control Valve
Figure 19 - Checking Gas Joints for
Natural Gas
Equipment
Shutoff
Valve
Gas
Meter
Gas Control Valve
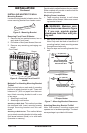
CONNECTING TO ELECTRICAL
SUPPLY
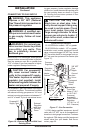
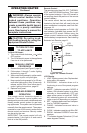
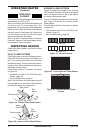
WARNING: Fan accessory
must be grounded. Fan comes
with a three-prong, grounding
plug as shown in Figure 21. The
plug is your protection against
electrical shock. Plug it into a
standard, three-hole, grounded,
outlet. If cord needs replacing,
use only a cord with a three-
prong, grounding plug.
CAUTION: Label all wires
prior to disconnection when
servicing controls. Wiring errors
can cause improper and danger-
ous operation (see page 29).
EXTENSION CORD
Use extension cord if needed. The cord must
have a three-prong, grounding plug and a
three-hole receptacle. Make sure cord is in
good shape. It must be heavy enough to carry
the current needed. An undersized cord will
cause a drop in line voltage. This will result
in loss of power and overheating. Use a No.
16 AWG cord for lengths less than 50 feet
(15.24 m) .
CAUTION: Verify proper op-
eration after servicing.
Grounding Plug
Grounded Outlet
Figure 21 - Grounding Plug