


10
104888
UNVENTED PROPANE/LP GAS FIREPLACE
LFP33PR
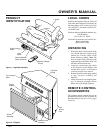
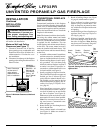
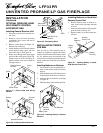
Supplied Firebox
Hood Must Be
Used at All Times
Wire-mesh
Screen
Firebox
Noncombustible
Material May
Project Off this
Surface above
the Firebox Hood
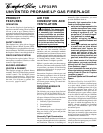
Mantel Shelf
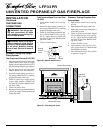
13" 16" 19" 21"
2
1
/2
"
6"
8"
10"
Note:
All vertical
measurements are
from top of fireplace
hood opening to bottom
of mantel shelf.
These minimum
clearances replace any
other recommended
clearances supplied with
your ANS Z21.11.2
approved gas logs.
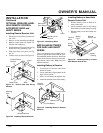
Wall board or facing
material (above
firebox) may be of
combustible material,
including decorative
mantel ornaments or
other similar projec-
tions off of the facing
material.
Framing
Material
CAUTION: Use only new,
black iron or steel pipe. Inter-
nally-tinned copper tubing may
be used in certain areas. Check
your local codes. Use pipe of 1/2"
diameter or greater to allow
proper gas volume to fireplace. If
pipe is too small, undue loss of
pressure will occur.
INSTALLATION
Continued
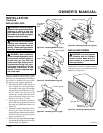
Mantel Clearances for Built-In
Installation
If placing mantel above built-in fireplace,
you must meet minimum clearance between
mantel shelf and top of fireplace opening.
If your installation does not meet the above
minimum clearances, you must:
• raise the mantel to an acceptable height
OR
• remove the mantel
Figure 15 - Minimum Mantel Clearances for Built-In Installation
INSTALLING GAS PIPING TO
FIREPLACE LOCATION
Installation Items Needed
Before installing fireplace, make sure you
have the items listed below.
• external regulator (supplied by installer)
• piping (check local codes)
• sealant (resistant to propane/LP gas)
• manual shutoff valve *
• test gauge connection *
• sediment trap
• tee joint
• pipe wrench
• approved flexible gas line with gas connec-
tor (if allowed by local codes) (not provided)
* An A.G.A. design-certified manual shutoff
valve with 1/8" NPT tap is an acceptable
alternative to test gauge connection. Pur-
chase the optional A.G.A. design-certified
manual shutoff valve from your dealer. See
Accessories, pages 24 and 25.
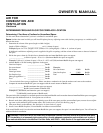
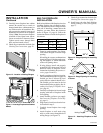
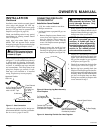
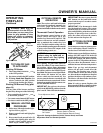
The installer must supply an external regu-
lator. The external regulator will reduce
incoming gas pressure. You must reduce
incoming gas pressure to between 11 and 14
inches of water. If you do not reduce incom-
ing gas pressure, heater regulator damage
could occur. Install external regulator with
the vent pointing down as shown in Figure
16. Pointing the vent down protects it from
freezing rain or sleet.
WARNING: A qualified ser-
vice person must connect fire-
place to gas supply. Follow all
local codes.
CAUTION: Never connect
heater directly to the propane/LP
supply. This heater requires an ex-
ternal regulator (not supplied). In-
stall the external regulator between
the heater and propane/LP supply.
Figure 16 - External Regulator with Vent
Pointing Down
Propane/LP
Supply
Tank
External
Regulator
Vent
Pointing
Down