


111515-01C
For more information, visit www.desatech.com
For more information, visit www.desatech.com
17
17
OPERATING HEATER
Hand-Held Remote Operation (Cont.)
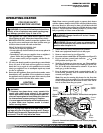
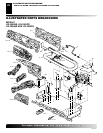
INSPECTING BURNERS
Pilot Flame Pattern
Burner Primary Air Holes
Main Burner
INSPECTING BURNERS
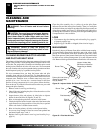
Check pilot flame pattern and burner flame patterns often.
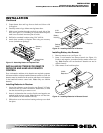
PILOT FLAME PATTERN
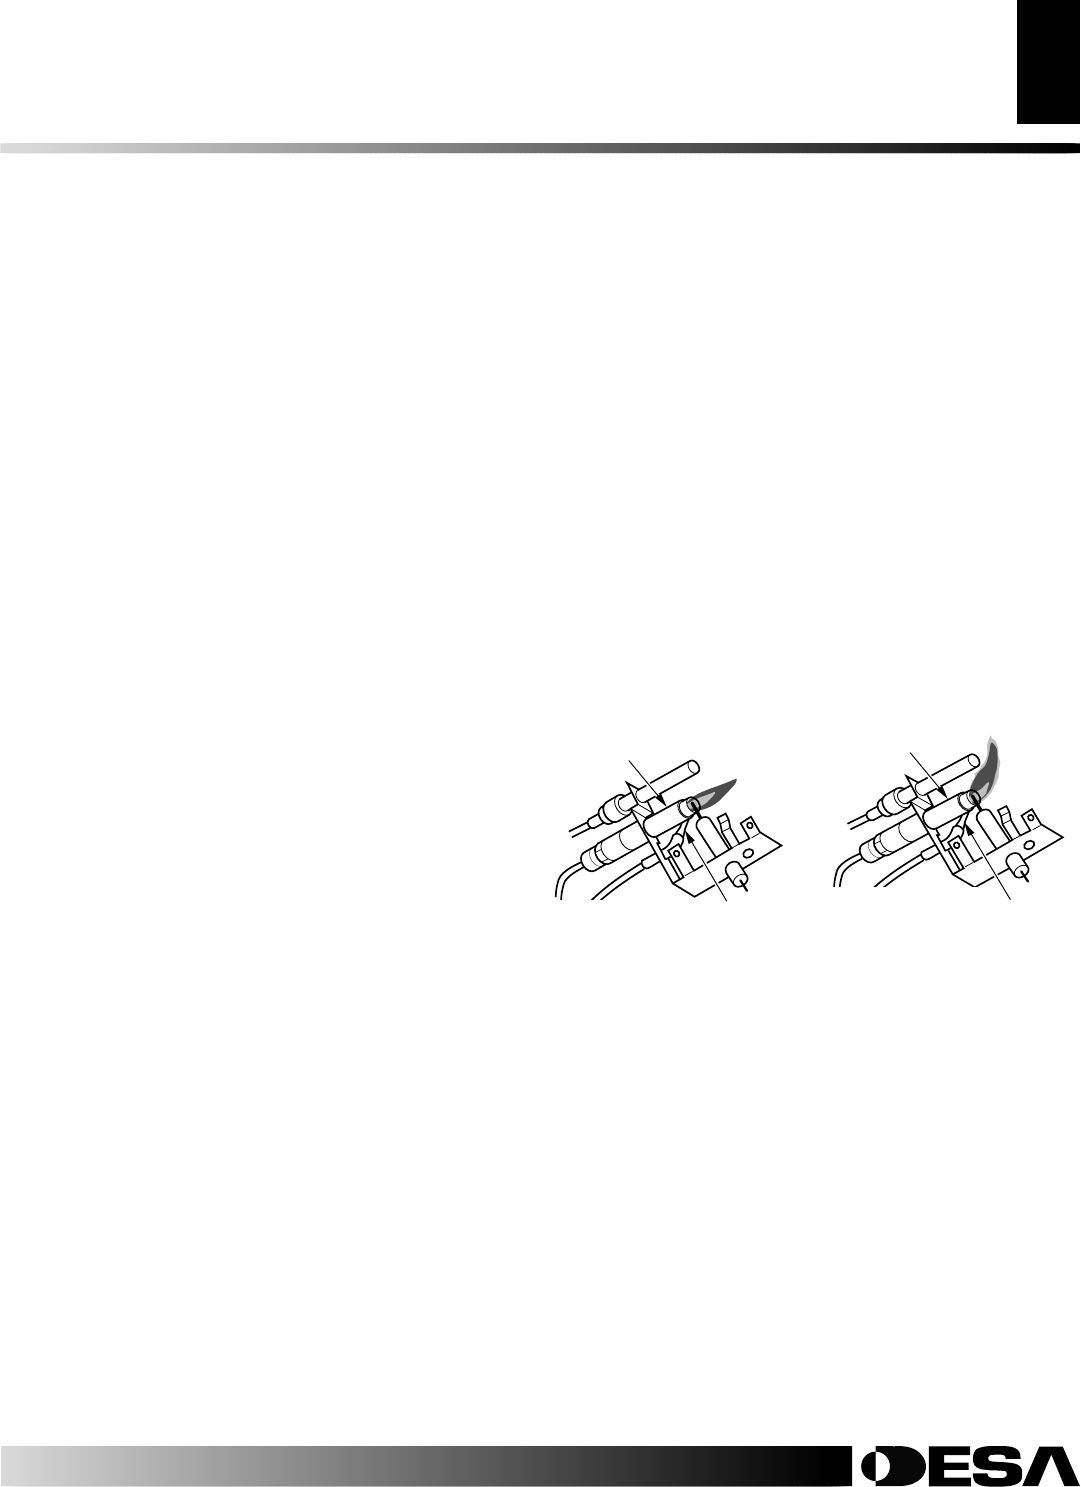
Figure 30 shows a correct pilot flame pattern. Figure 31 shows an
incorrect pilot flame pattern. The incorrect pilot flame is not
touching the thermocouple. This will cause the thermocouple to
cool. When the thermocouple cools, the heater will shut down.
If pilot flame pattern is incorrect, as shown in Figure 31
• turn heater off (see To Turn Off Gas to Appliance, page 16)
• see Troubleshooting, pages 19 through 21
Note:
The pilot flame on natural gas units will have a slight curve,
but flame should be blue and have no yellow or orange color.
Figure 30 - Correct Pilot Flame
Pattern (Your pilot may vary
from pilots shown)
Pilot Burner
Thermocouple
Pilot Burner
Thermocouple
Figure 31 - Incorrect Pilot
Flame Pattern (Your pilot may
vary from pilots shown)
BURNER PRIMARY AIR HOLES
Air is drawn into the burner through the holes in the fitting at the
burner entrance. These holes may become blocked with dust or lint.
Periodically inspect these holes for any blockage and clean if
needed. Blocked air holes will create soot.
MAIN BURNER
Periodically inspect all burner flame holes with the heater running.
All slotted burner flame holes should be open with yellow flame
present. All round burner flame holes should be open with a small
blue flame present. Some burner flame holes may become blocked
by debris or rust, with no flame present. If so, turn off heater and let
cool. Remove blockage, blocked burner flame holes will create soot.
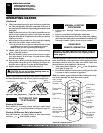
OPERATING HEATER
Continued
Fahrenheit/Celsius Temperature Indication
To toggle between temperature degrees Fahrenheit and Celsius
perform the following steps.
1. Press the up and down key until the small triangle is to the
left of the clock icon (see Figure 29, page 16).
2. From time 0:00, press the left key 10 times. The display
will then show the transmitter address (frequency).
3. Press the right key to toggle from °F to °C and vice versa.
4. Press the left key to exit this function.
Setting Flame Height
Press the up or down key until the small triangle is to the left of
large flame icon at the top of LCD display (see Figure 29, page
16). Press the left or right key to set the desired flame height. Six
flame levels are available from 1 (minimum) to 6 (maximum).
Setting Room Temperature
Press the up or down key until the small triangle is to the left of
the thermometer icon (see Figure 29, page 16). Press the left or
right key to set the desired room temperature.
Setting Timer (Sleep Function)
Press the up or down key until the small triangle is to the left of
the clock icon (see Figure 29, page 16). Press the left or right key
to set the desired sleep time. Maximum sleep time is 90 minutes,
in 15 minute increments. When desired time is set, press the up
or down key to start the timer. When the desired time has
elapsed, the appliance will automatically switch off.
Child Safety Lock-Out
To lock the remote control keys, press the On/Off key then
immediately press the up key (see Figure 29, page 16). The lock-
out function is active when the lock icon is lit. Repeat key
sequence to unlock keys.
Low Battery Detection and Backup
A battery icon will be displayed on the LCD display when
batteries are low in the remote control (see Figure 29, page 16).
When the receiver detects a low battery condition;
• Three acoustic "beeps" are generated from the receiver
• Appliance is turned off and will go to the maximum flame height
• Execution of commands is inhibited until batteries are replaced
When batteries are low, it is not possible to turn on the appliance
with the remote control. Appliance can be turned on or off
manually by setting the backup switch of the receiver to MAN
position (see Figure 13, page 11). Remote control and receiver
will restart normal operation after batteries are replaced. See
Installing Batteries for Remote Receiver and Hand Held Remote
Control, page 11.
Timeout
If appliance is turned on and no command is sent to the receiver
for 24 hours, appliance will automatically shut down. Com-
mands sent after shutdown will be executed normally.