


104463-01E
For more information, visit www.desatech.com
For more information, visit www.desatech.com
10
INSTALLING GAS LOG HEATER INTO STOVE
1. Remove log and gas log heater from carton.
Note:
Do not pick
up gas log heater by the burner itself. This could damage heater.
Always handle the gas log heater by the heater base only.
2. Remove all protective packaging applied to log and gas log heater
for shipment.
3. Check all items for any shipping damage. If damaged, promptly
inform dealer where you bought heater.
4. If not already removed, remove back panel from assembled
stove body (see Figure 5, page 8). Use an adjustable wrench or
a 10 mm socket. Remove six (6) bolts and washers. Keep bolts
and washers to reattach back panel later.
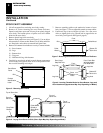
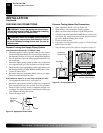
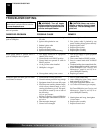
5. Set gas log heater inside stove (see Figure 13). Make sure control
knob extensions pass through bottom front opening.
6. Align outside holes on heater base with four (4) mounting holes
on the stove bottom (see Figure 13).
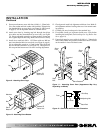
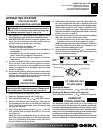
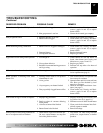
7. Fasten heater base to stove bottom with #10-24 x .50 bolts and
hex nuts provided with gas log heater (see Figure 14). Attach-
ment hardware is factory packed inside plastic bag with instal-
lation manual and owner’s registration card. Push bolt through
heater base mounting hole and through stove bottom. Connect
hex nut to bolt on underside of stove bottom. The bolt hex
head is for a 5/16" socket and the hex nuts are for a 3/8" socket.
If sockets are not available, use adjustable wrenches.
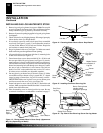
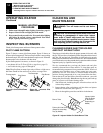
8. Set one-piece log on heater base as shown in Figure 15. Make
sure middle section at bottom of log is seated into "U" shaped
cutout in center of heater base. Log will fit securely on base.
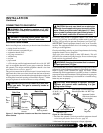
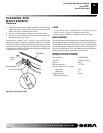
IMPORTANT:
Make sure log does not cover any burner ports
and does not touch the stove cavity (see Figure 16).
9. Fasten back panel to stove with six (6) M6 x 1.20mm bolts and
washers. Make sure product identification label is located on the
outside lower left-hand corner.
10. Place freestanding stove in desired position in room. Be sure
to maintain clearances to combustibles as outlined on page 7.
INSTALLATION
Continued
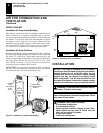
Figure 13 - Placing Heater Base In Stove Cavity (Appearance
May Vary Depending on Model)
Bottom
Front
Opening
Stove Bottom
Burner
Bolt
Heater Base
L
O
PILOT
OFF
HI
Figure 14 - Fastening Heater Base to Stove Drop Bottom
Stove Bottom
Heater
Base
Bolt
Hex Nut
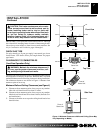
Figure 15 - Installing One-Piece Stove Log Set
Burner Porting Areas
(double slotted
rectangular openings
Figure 16 - Top View of One-Piece Log Set on Gas Log Heater
Safety Pilot Location
One-Piece
Log Set
One-Piece
Log Set
Heater
Base
"U" Shaped
Cutout in
Chassis
Burner
Middle Section
at Bottom of
Log Set
INSTALLATION
Installing Gas Log Heater Into Stove