


www.desatech.com
111916-01F 15
D. Do not use this appliance if any part has been
under water. Immediately call a qualified
service technician to inspect the appliance and
to replace any part of the control system and
any gas control which has been under water.
LIGHTING
INSTRUCTIONS
1. STOP! Read the safety information above
before proceeding.
2. Set the “HI-LO” knob to the lowest setting.
3. Turn off all electrical power to the appliance.
4. Open control access panel.
5. Push in gas control knob slightly and turn
clockwise to “OFF”.
6. Wait five (5) minutes to clear out any gas.
Then smell for gas, including near the floor.
If you smell gas, STOP! Follow “B” in the
safety information above. If you donʼt smell
gas, go to the next step.
7. The pilot is located by the main burner.
8. Turn knob on gas control counterclockwise
to “PILOT”.
9. Push in the control knob all the way and hold
in. Immediately light the pilot by pressing the
red ignitor button until a flame appears. Con
-
tinue to hold the control knob in for about one
(1) minute after the pilot is lit. Release knob
and it will pop back up. Pilot should remain
lit. If it goes out, repeat steps 5 through 9.
• If knob does not pop out when released, stop
and call service technician or gas supplier.
• If the pilot will not stay lit after several tries,
turn gas control knob to “OFF” and call
your service technician or gas supplier.
10. Turn gas control knob counterclockwise
to “ON”. Knob can be turned to “ON”
only if the control knob is popped out.
11. Set “HI-LO” knob to desired setting.
12. Turn on all electric power to the appliance.
Note: It is recommended that you maintain the
gas control knob in the full OFF position during
lengthy periods of seasonal non-usage.
OPERATING FIREPLACE
Continued
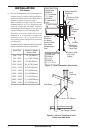
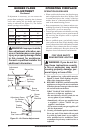
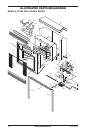
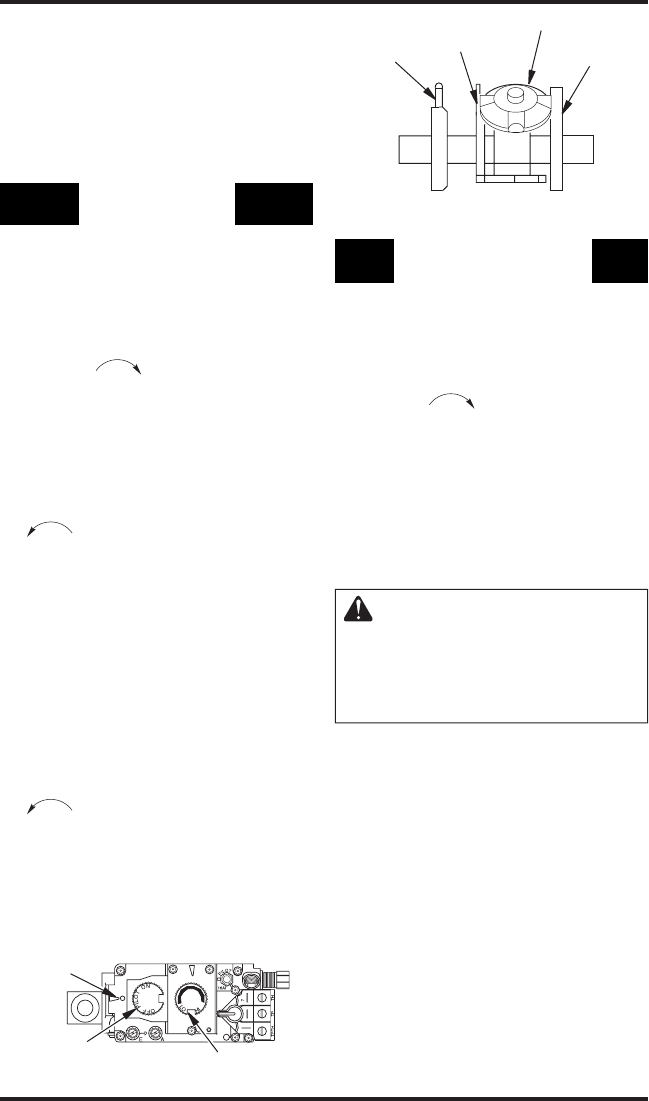
Figure 32 - Control Knob in Pilot Position
Figure 33 - Pilot
Thermocouple
Pilot Burner
Piezo
Ignitor
Thermopile
Position
Indicator
Gas Control
Knob
HI/LO Knob
TO TURN OFF GAS
TO APPLIANCE
1. Turn off the wall switch.
2. Turn off all electric power to the appliance
if service is to be performed.
3. Remove control access panel.
4. Push in gas control knob slightly and turn
clockwise
to “OFF”. Do not force.
5. Replace control access panel.
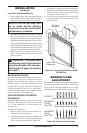
CONVERTING FIREPLACE
FROM NATURAL GAS TO
PROPANE/LP GAS
The conversion kit is packaged with the unit.
Please check the contents before beginning
this conversion.
WARNING: Before proceed-
ing, make sure the gas control
valve is in the OFF position and
all electrical power to the appli
-
ance is turned off.
CONVERTING PILOT
1. Wait five (5) minutes to clear out any gas. Smell
for any gas odor, especially near the floor. If any
gas odor is present, STOP! See For Your Safety
Read Before Lighting on page 14.
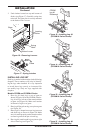
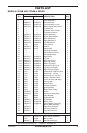
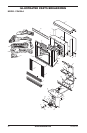
2. Locate the latch on the louver assembly.
Remove top and bottom louvers by pulling
the spring latches toward the center of the
fireplace simultaneously until they are disen
-
gaged from the locating holes.
3. Undo latches located on top and bottom of fire
-
box and swing door to the fully open position.
4. Carefully remove log set and ember material from
burner and place them aside in a safe place.
5. Replace main burner orifice with burner orifice
included in conversion kit (Model CD42M-A
series contains two burner orifices).