


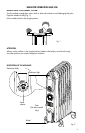
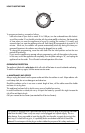

HOW TO USE THE TIMER
To programme heating, proceed as follows:
- Look at the time on your clock or watch. If it is 9:00 pm, turn the numbered timer disk clockwi-
se until the number 21 on the disk coincides with the pointer ▲ (2) on the timer. Set the periods
of time when you want the appliance to be on by pushing the notches (1) inward, and
outward when you want the appliance to be off. Each notch (3) corresponds to a period of 15
minutes. When set, the radiator will operate automatically each day during the times pro-
grammed (important: the radiator must always be plugged into an outlet).
- To change the programming, move the notch back into the initial position and set the new
periods of functioning.
- If you want the appliance to operate without programming, push all the notches to the center.
In this case, to shut the appliance off completely, turn the power setting to "0", and unplug the
appliance from the outlet. This will avoid continued operation of the timer
OVERHEATING PROTECTION
The appliance is fitted with a safety device which will switch off the heater in case of accidental overheating.
To start the radiator up again, call the nearest service center.
6. MAINTENANCE AND SERVICE
Always unplug the heater from the power outlet and allow the radiator to cool. Wipe radiator with
a soft damp cloth; do not use detergents and abrasives.
Should the radiator not be in use over a certain length of time, roll the cable around the holder
and store it in a dry place.
This appliance has been built to last for many years of trouble-free service.
In case of malfunction or doubt, do not try to repair the heater by yourself: this might increase the
risk of fire and electric shock.
Call your nearest Service Center (see attached list of Service Centers).
Your product is equipped with a polarized alternating current line plug (a plug having one blade
wider than the other). There is only one way it can be plugged into a power supply. This is a
safety feature. If you are unable to insert the plug fully into the outlet, try again by turning it the
other way. If it would still not go in, it is probably due to an obsolete outlet which should be
replaced. Do not tamper with the plug or outlet to defeat the purpose of this safety mechanism.
5
1
1
2
2
3
3
4
4
5
5
6
6
7
7
8
8
9
9
10
10
1
1
11
12
12
1
3
1
3
14
14
15
15
16
16
1
7
1
7
18
18
1
9
1
9
20
20
2
1
2
1
2
2
2
2
2
3
23
2
4
24
1
2
3