


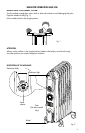

1. LOCATION
Place heater on the floor beneath the coldest window in the room, or any other location. Your hea-
ter will reduce the effect of cold drafts. The heater should not be placed immediately below a
power outlet. Do not use this radiator in rooms with a floor area of less than 43 square feet (4 sq.
m.).
2. CONNECTION
The radiator should be connected to a properly polarized A/C 110/120 V household outlet in
good condition. Keep loose clothing or bedding, furniture and flammable material away from the
heater’s wall outlet.
3. TURNING ON
Insert the plug into an electrical outlet, rotate the thermostat knob (if provided) to maximum and
turn the unit on as follows using the power selector:
• Turn the power selector to position 1 to select minimum output (the light on the left will come on).
• Turn the power selector to position 2 to select medium output (the light on the right will come on).
• Turn the power selector to position 3 to select maximum output (the lights will come on).
4. WATTS ECONOMIZER
For more efficient operation, use power setting 1 or 2 after your desired temperature has been rea-
ched.
Adjusting the thermostat
When the room has reached the desired temperature, turn the thermostat knob slowly in a clockwi-
se direction, stopping when you hear a click sound. The unit will maintain the set temperature and
conserve energy by cycling on and off.
If your unit has three power settings, on days when temperatures are not particularly cold, select
minimum output to optimize efficiency and energy savings.
Antifreeze function
Turn the thermostat dial to the and select a power level 3. The appliance will maintain a mini-
mum room temperature of approximately 42°F (5°C), thus preventing freezing temperatures while
conserving energy. In models that come with a timer, tabs must be set in the inward position.
REMINDER
To completely shut the appliance off, turn the power selector to the 0 position and then unplug the
appliance from the outlet.
5. TIMER (ON SELECTED MODELS)
ABOUT THE TIMER The programmable clock timer allows you to preprogram every 15 minute
period of the 24 hour day. So the heater conserves energy by operating only when you need it!!
Clock setting
The programmable timer, as with all clocks, must be set to the correct time. If for example the time
is 1:30pm, rotate the dial clockwise (following the direction of the arrow) until 13:30 is aligned
with the triangular pointer.
IMPORTANT:
DO NOT ROTATE CLOCK DIAL COUNTER-CLOCKWISE.
The timer is in effect an electric clock and would only work while it is plugged into a power supply.
When unplugged, the timer stops and must be later re-set.
4