7
PREPARING FOR OPERATION IN WATER MODE
Once the appliance has been installed following the instructions
above, it is ready for use. However, its efficiency can be enhan-
ced by operating it in the exclusive De'Longhi water mode. The
water in the tank increases the cooling power of your Pinguino
and at the same time reduces noise levels and electrical con-
sumption. Compared to air, water reduces the temperature of
the cooling circuit much more efficiently, before being given off
from the air exhaust hose in the form of vapour.
Remember that:
•You must always use salt-free tap water.
• The length of time the water in the tank lasts depends greatly
on environmental conditions such as temperature, humidity,
insulation, the exposure of the room, the number of people
present, etc. Indicatively it lasts about six hours. By using the
WATERSAVE function (see page 13), the length of time can be
extended to 10 hours, with a slightly lower cooling power and
efficiency.
• When the water in the tank runs out, the light comes on
and operation of the appliance switches automatically to air
to air operation. At the same time, the quantity of air given
out from the rear hose increases.
FILLING THE TANK
You can fill the tank in one of two ways:
1) By using the water jug provided:
Use the water jug provided or any other plastic/glass bottle or
watering can, providing the neck of the bottle or watering can is
narrow enough to enter the filling hole to avoid spilling water on
the appliance.
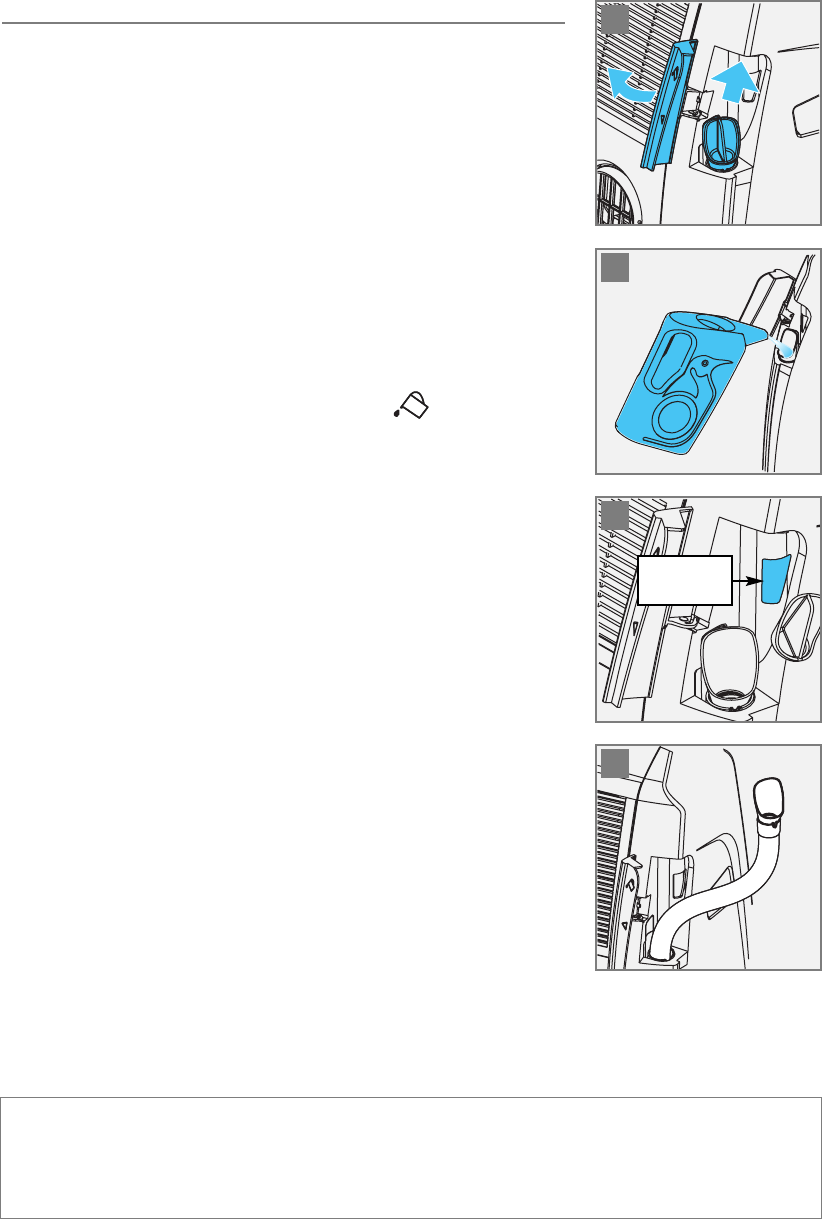
•Without using force, open the water fill door (J) completely,
then remove the rubber cap (fig. 12).
• Pour the water into the tank (fig. 13). When the tank is full, the
water level window (fig.14) becomes completely red.
Indicatively, you will need to refill the jug three times to fill the
tank completely.
• After filling, put the rubber cap back in place, then close the
door.
2) Using the extendible hose:
•Without using force, open the water fill door (J) completely,
then remove the rubber cap (fig. 12). Pull out the extendible
hose (fig. 15) and place near a tap.
• Fill the tank to the required level.
• When the tank is full, the water level window (fig. 14) beco-
mes completely.
• After filling, put the rubber cap back in place, then close the
door.
12
13
14
15
Level
window
The tank does not have to be full to use the water function, but the length of time the
appliance will operate in water mode will be shorter.
When the level window has become completely red, do not add further water or it
could overflow. The tank has no overflow prevention system.
✔
✔


