


MAN# 650264:B
Set Up
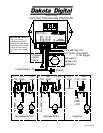
1. Press and hold SW2, then turn the key on.
2. Release SW2, then press and release SW1 to move onto the next step.
3. To select temperature scale to use, press and hold SW1 to select (Fahrenheit)
or press and hold SW2 for
(Celsius). Hold the switch for longer than one sec to select. Once a temperature
scale is selected, the display will flash and go on to next setting.
4. Display will now read indicating low fan on temperature is to be set. Use SW1 or SW2 to select the
temperature at which the fan should turn on. Press both switches to save the setting. Display will flash once
setting is saved.
Note: SW1 increases the temperature, while SW2 decreases the temperature.
5. Display will now read indicating low fan off temperature is to be set. Again, use SW1 or SW2 to set the
temperature at which the fan should turn off. Press both switches to save the setting.
6. If two fan or dual speed fan mode was previously selected, temperature settings for the high fan output are at this
point in setup for convenience. If single fan mode is set up, setup will skip high temp settings and go to step 7.
6a. Display will now read indicating high fan on temperature is to be set. Use SW1 or SW2 to set the
temperature at which the fan should turn on. Press both switches to save the setting.
6b. Display will now read indicating high fan off temperature is to be set. Use SW1 or SW2 to set the
temperature and press both switches to save the setting.
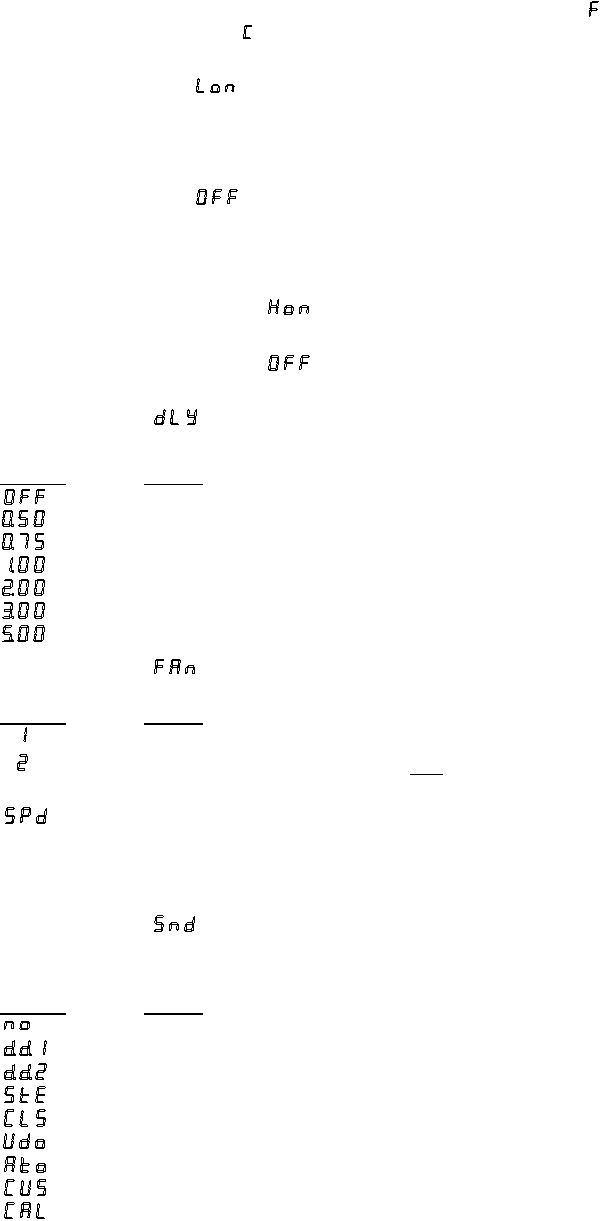
7. Display will read Use SW1 or SW2 to cycle through the following options. Press both switches to select an
option.
Display Option
Fan will turn off when key is turned off.
If fan was running at key off, it will continue to run for 30 seconds after key is turned off.
If fan was running at key off, it will continue to run for 45 seconds after key is turned off.
If fan was running at key off, it will continue to run for 1 minute after key is turned off.
If fan was running at key off, it will continue to run for 2 minutes after key is turned off.
If fan was running at key off, it will continue to run for 3 minutes after key is turned off.
If fan was running at key off, it will continue to run for 5 minutes after key is turned off.
8. Display will read indicating fan type is to be set. Use SW1 or SW2 to select the fan type used. Press both
switches to save setting.
Display Option
one single speed fan (only low fan output used)
two single speed fans (high and low fan outputs both on for high temp,
& some dual spd fans only low fan output on for low temp)
one dual speed fan (high fan output on, low fan off for high temp,
high fan off, low fan on for low temp)
Note: If two fan or dual speed are selected and high fan temp setting was not set before, setup will return to step
6 to allow temp settings to be made.
9. Display will read signaling to select a sender type. Press SW1 to move through
list forward, press SW2 to back up. Press both switches to save setting. The supported
senders are listed below with the display that represents each option.
Display Option
No gauge, dedicated Dakota Digital sender only
Dakota Digital individual temp gauge with sender
Dakota Digital instrument cluster with control box (ver. STR-D or later, older versions use CUS)
Stewart Warner gauge and sender
Classic gauge and sender
VDO gauge and sender
Autometer gauge and sender
Custom calibrated gauge
Custom calibration (for gauge sets not listed above)
10. If your gauge is not supported in one of the options above, you will need to custom calibrate the controller for your
gauge. (if CUS is selected and calibration has not been done, the calibration sequence will automatically be
started). The following is the procedure for custom calibration. If your gauge system is listed above, skip this
portion and continue at step 11.