


4 5
Installation
Tools needed: Small Phillips Screwdriver;
Large Phillips Screwdriver; Small Standard Screwdriver.
Set Up:
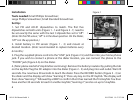
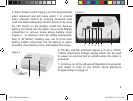
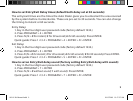
1. Set PIR and AD-01 dipswitches to match. The rst ve
dipswitches on both units (Figure 1 - 1 and Figure 2 - 1) need to
be set exactly the same with the last 3 dipswitches set to “o”.
(Note: On the PIR sensor, “o” is in the down position. On the Dialer,
“o” is in the up position.)
2. Install battery in PIR sensor (Figure 1 - 2) and mount at
desired location. (Note: recommended to replace batteries every
6 months.)
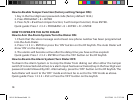
3. Plug the supplied phone cord into the “LINE” jack (Figure 2-5) and then into your home phone
jack. If you wish to connect a phone at the dialer location, you can connect the phone to the
“PHONE” jack (Figure 2-6) on the dialer.
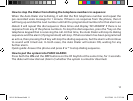
4. (Note: please read all of step 4 before continuing). Remove the battery insulator by pulling the tab
on the keyfob. Plug the DC adaptor into the dialer (Figure 2 - 3) and plug into wall outlet. Wait 20
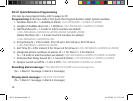
seconds. You now have 30 seconds to teach the dialer. Press the RECORD button (Figure 3 - 3) on
the dialer and the display will show “learning 0.” Press any key on the RF Keyfob. The display will
then show “learning 1” followed by a BEEP to conrm that it has learned the rst keyfob. You then
have another 30 seconds to teach it another keyfob (“learning 2”) and so on up to 5 keyfobs.
Figure 1
1
2
AD-01 Kit Manual.indd 4 10/15/2009 10:17:55 AM