


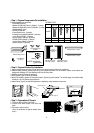


8
• Step 6 - Recheck Installation
To be sure you have correctly installed your Room Air Conditioner, review the steps and make sure all of the
parts are securely fastened in the window as the instructions show. A tight seal is essential.
Read through the Use & Care manual to become familiar with the operation of your room air conditioner.
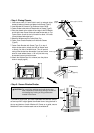
• Step 7 - Install Unit and assemble Front Grille
1. Fasten Drain to Base Pan with “Type D” screws. only.
Use of any other longer screw may result in the leakage of
refrigerant and will cause serious damage to the unit.
2. Push the unit into the installed Chassis.
3. Fasten Base Pan and Chassis with screws to side holes.
4. Assemble Front Grille into Chassis holes.
– Snap Front Grille’s hook to each Chassis holes.
(Be careful the end of ventilation bar is to be located in the gap of blade.)
5. Fasten Front Grille with screws.
6. Insert Filter into the Front Grille.
7. Push the Knobs into the control.
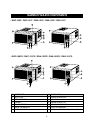
• Step 8 - Recheck the entire installation
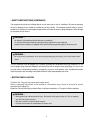
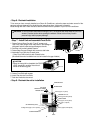
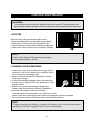
CONDENSOR
PAN BASE
WALL
Screw (Type B, 2x2=4 pieces)
38mm
15
SILL
Screw (Type C, 3 pieces)
Screw (Type C, 2x1=2 pieces)
GUIDE LOWER
WINDOW KIT 'R & 'L
Screw (Type E, 2x4=8 pieces)
Screw (Type C, 2 pieces)
WINDOW SASH
TOP GUIDE
WINDOW SEAL A
WINDOW KIT FRAME
WINDOW SEAL B
SILL BRACKET(2 pieces)
OUTER WINDOW SILL
Leveling Screw (Type A, 2x1= 2 pieces)
SEAL DRAIN
DRAIN
Screw (Type D)
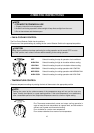
CAUTION Do not lift window sash without holding the unit. The window sash helps keep the unit in the
window. Exercise caution when opening the window. Failure to do so many result in
personal injury and/or property damage.
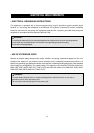
CAUTION
• When the front grille is reinstalled, the DOOR
VENT should be in position first so that it
would not be bent by grille.
Door Vent