C. PREPARE THE APPLIANCE FOR
INSTALLATION
Open the shipping carton and remove the components.
Check to see that all of the installation parts are present. They
should include the purification assembly, storage tank, faucet,
installation hardware, RO membrane cartridge and tubing.
Check to see that the air supply in the empty tank is approxi-
mately 7 psi (48 kPa). Adjust it if necessary. If an optional
percent rejection monitor is selected, the probes should be
installed at this time. Follow the instruction that came with the
monitor. To ensure you the highest level of purity, the RO
membrane cartridge has been shipped separately in a sealed
plastic bag. Follow the steps below to install the RO mem-
brane cartridge.
STEP 1: Cut open the sealed plastic bag and remove the RO
membrane cartridge.
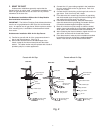
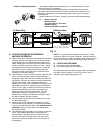
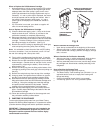
STEP 2: Remove the white plug from the fitting at the bottom
of the cartridge by pushing in the small gray collet and pulling
out the plug simultaneously (see Figure 6).
STEP 3: Connect the red SFC reject tubing by inserting the
open end into the fitting at the bottom of the RO membrane
cartridge as far as it will go. Take note of the tag attached to
the SFC tube which indicates the outlet end.
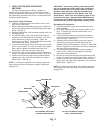
STEP 4: Remove the red plastic cap from the top of the car-
tridge.
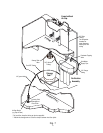
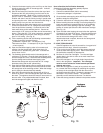
STEP 5: Line up the cartridge ears (Fig. 10), insert the car-
tridge and push it into the head until it is fully seated. Twist the
cartridge 1/4 turn counterclockwise to lock it into place. The
final orientation should be such that the cartridge label faces
towards the front and the fitting is located towards the rear.
D. MAKE THE FAUCET MOUNTING HOLE
A wide variety of RO faucet mounting situations may be
encountered. The most common are stainless steel or ceramic
on metal sinks. Consult your dealer for any other materials
which may be encountered.
The faucet should be positioned so that it empties into the
sink and the spout swivels freely for convenience.
If the sink already has a hole provided that can accommo-
date the RO faucet, then no drilling is required.
NOTE: If desired, sprayers can be disconnected to provide a
suitable mounting hole for the RO faucet. A pipe cap or plug
will be required to seal the sprayer connection.
IMPORTANT: It is mandatory that safety glasses by worn dur-
ing the sink hole drilling operations in order to prevent eye injury.
Before drilling the hole, always check underneath the sink to
ensure that nothing will interfere with mounting the faucet such as
reinforcing ribs, support brackets or the cabinet construction.
Stainless steel sink, air gap or non-air gap faucet.
Recommended tools:
• Center punch
• Variable speed drill and high speed drill bits
• Greenlee 7/8" chassis punch (alternate 9/16"
may be used for a non-air gap faucet)
• Protective gloves
Procedure:
1) Center punch a small indent at the center of
the desired faucet location.
2) Slowly drill the required pilot hole for the
chassis punch.
3) Set up the chassis punch per the instructions and
tighten the nut to cut the desired hole size.
4) Clean up all sharp edges with a file if necessary.
Porcelain/Enamel/Ceramic sink on sheet metal or cast iron
base; air gap or non air gap faucet.
Recommended tools:
• Variable speed drill
• Relton 7/8" porcelain cutter tool set (alternate
9/16" porcelain bit may be used for a non-air
gap faucet)
• Plumber's putty
It is important to understand what is involved in this proce-
dure. First, the glassy layer of porcelain must be penetrated
through to the base metal. Second, a center disc of porcelain
must be removed while protecting the surrounding porcelain
against chipping or fracturing. Third, the base metal must be
drilled through to complete the hole.
Procedure:
1) Mark the center for the 7/8" hole.
2) Form a shallow putty dam around the hole area and fill it
with enough water to lubricate the carbide drill bit.
3) Carefully drill a pilot hole through the porcelain/enamel and
the base metal using a carbide type pilot drill.
Important: Always operate the drill with light pressure at
a slow speed (300-400 rpm).
4) Insert the pilot tip of the spring-loaded porcelain cutter into
the pilot hole.
5) Drill the porcelain/enamel using the spring-loaded porcelain
cutter, making certain a complete ring has been cut through
the porcelain/enamel to the metal base.
6) Change to the metal cutter. With a slow speed and light
pressure, cut away the inner porcelain/enamel disc down
to the base metal. Make certain that the cutter does not
touch the outer rim of the cut porcelain/enamel. Continue
with this bit to cut completely through the metal.
IMPORTANT: When using a porcelain cutter it is critical
that it is always in a sharpened condition. Dull cutters are
known to chip sinks.
4


