


These instructions do not claim to cover all details or variations in the equipment, procedure, or process described, nor to provide directions for meeting every possible
contingency during installation, operation or maintenance. When additional information is desired to satisfy a problem not covered sufficiently for user’s purpose, please
contact your nearest representative.
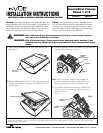
Customer First Center • 1121 Hwy 74 South • Peachtree City, GA 30269 IMI-572 AVU040062
Ascent/Strut Fixtures
Sheet 4 of 5
4/26/04 IMI-572
INSTALLATION INSTRUCTIONS
IMPORTANT: READ CAREFULLY BEFORE INSTALLING FIXTURE.
TM
WARNING: Risk of Electric Shock. Disconnect power at fuse or circuit breaker before installing
or servicing.
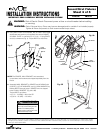
9. To reinstall POWER TRAY, hang POWER TRAY from POWER
TRAY HINGE, swing POWER TRAY up till POWER TRAY
LATCH snaps closed. Reconnect PRIMARY QUICK
DISCONNECT. Install lamp. Reinstall DOOR at 20°-30° angle
to housing, ensuring both hinges are engaged. Close DOOR,
ensuring DOOR LATCHES are completely engaged. (Listen
for both cams to “click” on each latch). (Fig. 9)
NOTE: Prior to installing the lamp, check to make sure lamp is of
proper type and wattage. Observe lamp manufacturer’s
recommendations and restrictions regarding lamp operation.
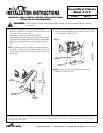
NOTE: Reflector are marked to insure reflector is installed in
proper orientation regarding “Street Side”. If other orientation
is desired, reflector may be rotated 90° in either direction.
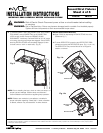
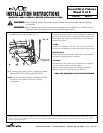
Fig. 11b
REFLECTOR
TABS
REFLECTOR
REFLECTOR
TABS
REFLECTOR
Fig. 11a
REFLECTOR Rotation/Removal:
10. Open DOOR by depressing LATCH BUTTONS into door.
(Reference Fig. 1)
11. To lower REFLECTOR, press the two REFLECTOR TABS
outward and swing the REFLECTOR down. (Fig. 11a & 11b).
The REFLECTOR may now be lifted off of its hinges for
rotation or removal.
Fig. 9
WARNING: Risk of Personal Injury. Fixture may become damaged and/or unstable if not installed properly.
Tighten all fixture components to their recommended torque values.