


5
PYROMASTER® UVHB10 Vent-Free Heaters
20004232
Preparing the UVHB10
The UVHB10 may only be used with the approved
mantel and hearth assembly.
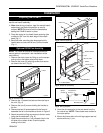
1. After determining a location, open the mantel hearth
base carton and place into position on a solid
surface. NOTE: Be sure to level the base before
setting the UVHB10 heater in place.
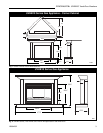
2. Place the heater on the hearth base centering side
to side and 3/4" from the back edge of the hearth
base (Fig. 1)
3. Bend the lower mounting tabs down against the
hearth base and secure with two (2) wood screws
(Fig. 1)
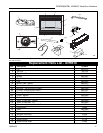
Optional FK24 Fan Hook-Up
NOTE: The FK24 fan should be installed before the
mantel cabinet is complete. Later installation will be
more difficult.
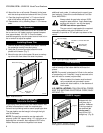
1. Remove the front screen by lifting up on the screen,
pulling out on the bottom and pulling down.
2. Remove the three (3) retaining screws that secure
the hood to the unit. (Fig. 3)
Installation
Hood
FP1224
Outer Top
FP1225
Fig. 4 Remove outer top.
Fan Bracket
Screws
Radiant Shield
Fan
Burner Tube
Shield
Thermo-disc
Hex Nut
Rheostat
To Receptacle
FP1226
Fig. 5 Attach fan to bracket.
Fig. 6 Wiring diagram.
FP394A
Wire Extension
Speed
Control
Temperature
Sensor
Fan
8. Hook the wire extension to the wire leads from the
fan control box. NOTE: These leads were hooked to
the motor earlier.
9. Mount the thermo-disc to the left log support tab and
secure with one (1) nut.
Fig. 3 Remove hood.
3. Remove the 13 screws that secure the outer top to
the unit. (Fig. 4)
4. Remove the two (2) screws holding the bracket to
the fan.
5. Remove the two (2) wires attached to the fan and
assemble the fan to the bracket as shown in Figure 5.
6. Attach the electrical flag connectors to the fan motor
using the wire extension. (Fig. 6)
7. Feed the wire down the 1-inch diameter hole in the
left side of the radiant shield. Push the plastic
bushing in the hole.