


WARNING:
1. Properly handling the bad fuse including its broken glass & metal to avoid the harm on hu-
man body.
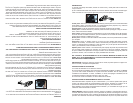
c) If fuse cover located between the two blades of attached plug (applicable to plug type: SL-
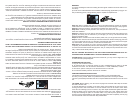
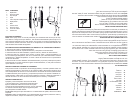
024) as following picture, taking following steps to replace incompetent fuse.
Step one: Select a suitable tool (the top of the tool should be tapering and at, for example,
travel scissors or small at screwdriver etc.), insert the tip of the tool into gap in the plug face.
Step two: Press the tool down, then prize the protection door of the fuse out.
Step three: Continue pull the protection door until you can’t draw it out, then you’ll nd the
whole fuse exhibited.
Step four: Insert the tip of your tool into fuse slot (close with the terminal), then prize the fuse
gradually and slowly, but not overexert. If you feel tight, you can try it at several times and
prize the fuse little by little.
Step ve: When one side of the fuse has been prized, then you can get the fuse out entirely.
Step six: Put a new fuse into the slot (the new fuse should near the end of the plug), then use
your tool to press fuse into slot, you shouldn’t press the glass tube of the fuse but the copper
cap at both sides, and not overexert, or else the fuse will be broke.
Step seven: Use your nger or a tool to push the protection door until the fuse be covered
completely, but sometimes the protection door will be tight or can’t be go forward, please make
sure the fuse have been xed at the right place. And you need push the protection door verti-
cally, or else it will be broke probably.
DO NOT OPERATE APPLIANCE IF THE LINE CORD SHOWS ANY DAMAGE OR IF AP-
PLIANCE WORKS INTERMITTENTLY OR STOPS WORKING ENTIRELY.
PLEASE NOTE: During the rst few minutes of initial use, you may notice a slight odor. This
is normal and will quickly disappear.
OPERATING INSTRUCTIONS
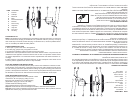
1. Plug fan into an electrical outlet.
2. To operate the fan, to control fan speed; on LOW, on MEDIUM and on HIGH or use dial
located on front of fan. Turn fan switch to desired level: 1 =LOW, 2=MEDIUM, 3=HIGH.
To turn off fan, pull the chain pull or use the switch and turn to O=OFF.
3. To make fan oscillate, pull down the chain for oscillation.
USER MAINTENANCE INSTRUCTIONS
This appliance requires little maintenance and contains no user serviceable parts.
Do not try to x it yourself. Refer it to qualied service personnel if servicing is needed.
This fan is permanently lubricated and will not require additional lubrication for the life of the
fan.
TO CLEAN: Before cleaning, turn fan off and unplug from electrical outlet. Wipe off excess
dust with a lint-free cloth.
To ensure adequate air circulation to the motor, keep vents located at the rear of the motor
housing free from dust accumulation. A vacuum cleaner hose can be used to clean these
vents. Do not submerge your fan in water or any other liquid. Disassemble grilles and blade.
Grilles and blade may be cleaned with mild soap and water. Use a soft, slightly damp cloth
to wipe the remaining fan parts. Do not allow water or any other liquid to get into the motor
housing or base. Reassemble fan after grilles and blade have dried completely. Do not plug
fan into electrical outlet until it has been fully reassembled.
ADVERTENCIA
1. Evite el mal manejo del fusible, incluido su vidrios rotos y metal para evitar el daño en el
cuerpo humano.
c) Si la cubierta del fusible esta situada entre las dos láminas del enchufe conectado (apli-
cable a enchufe: SL-204) siga los siguientes pasos para reemplazar el fusible dañado:
Primer paso: Seleccione la herramienta adecuada (la parte superior de la herramienta debe
estar alada y plana, (una tijera de viaje, o un destornillador plano pequeño, etc), inserte la
punta de la herramienta en el vacío en la cara de fusibles.
Segundo Paso: Pulse la herramienta hacia la puerta de protección de el fusible.
Tercer paso: Continuar abriendo la puerta de protección hasta que llegue al tope, a continu-
ación, usted encontrará el fusible.
Paso cuatro: Inserte la punta de la herramienta en la ranura del fusible (cerca del terminal),
entonces levante el fusible lentamente, pero sin excederse. Si el fusible se siente apretado,
puede intentar extraer el fusible poco a poco.
Quinto paso: Cuando un lado del fusible ha sido extraído, entonces puede extraer el fusible
por completo.
Sexto paso: Ponga un fusible nuevo en la ranura (el nuevo fusible debe estar cerca del
extremo del enchufe), a continuación, utilice la herramienta para presionar el fusible en la
ranura, no debe empujar el fusible por el tubo de vidrio, sino por la tapa de cobre de ambos
lados, y sin excederse, o bien el fusible se rompe.
Séptimo paso: Utilice el dedo o una herramienta para empujar la puerta de protección hasta
que el fusible quede cubierto por completo, si la puerta no cierra por completo, asegúrese
de que el fusible se ha jado bien en el lugar correcto. No es necesario empujar la puerta de
protección vertical, o de lo contrario se rompe probablemente el fusible.
NO UTILICE EL ELECTRODOMÉSTICO SI EL CORDÓN MUESTRA ALGÚN TIPO DE
DAÑO, SI EL ELECTRODOMÉSTICO FUNCIONA DE MANERA INTERMITENTE O DEJA
DE FUNCIONAR COMPLETAMENTE.
IMPORTANTE: Durante los primeros minutos de uso inicial, se podría producir un ligero olor.
Esto es normal y desaparecerá rápidamente.
INSTRUCCIONES DE OPERACIÓN
1. Enchufe el ventilador en una toma de corriente.
2. Para encender el ventilador, para controlar la velocidad del ventilador, en BAJA, en MEDIA
y en ALTA use el botón localizado en la parte frontal del ventilador. Gire el interruptor del
ventilador al nivel deseado: 1= BAJA, 2 =MEDIA, 3= ALTA. Para apagar el ventilador, tire de
la cadena de arrastre o utilice el interruptor y gire a O= OFF.
3. Para hacer oscilar el ventilador, tire de la cadena de oscilación.
INSTRUCCIONES DE MANTENIMIENTO PARA EL USUARIO
Este electrodoméstico requiere de poco mantenimiento y no contiene piezas útiles para el
usuario. No intente reparar el electrodoméstico usted mismo. Póngase en contacto con el
personal de servicio técnico calicado si se necesitara algún tipo de mantenimiento.
Este ventilador se encuentra permanentemente lubricado y no necesitará de ningún tipo de
lubricación adicional durante su vida útil.
PARA LIMPIAR: Antes de proceder a limpiar, apague el ventilador y desconéctelo del toma-
corriente. Retire el exceso de polvo con un paño libre de pelusas. Para asegurar una buena
circulación del aire hacia el motor, mantenga los agujeros de ventilación ubicados en la parte
posterior de la base del motor libre de cualquier acumulación de polvo. Se puede utilizar una