


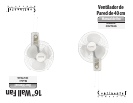

INTENDED USE
This product is intended only for indoor residential and ofce use; and is not intended for
industrial or other commercial use. Use your fan only with adequate wiring that is to the elec-
trical code in your state. If you have any questions about the adequacy of your wiring, consult
a qualied electrician.
IMPORTANT OPERATING INSTRUCTIONS.
When using electrical appliances, basic safety precautions should always be taken including
the following:
Use the fan only for purposes described in the instruction manual. To protect against electrical
shock, do not immerse the fan plug or main cable in water or spay with liquids. Close supervi-
sion is necessary when any appliance is used by or near children. Unplug from the electrical
outlet when not in use, when moving the fan from one location to another, before putting on or
taking off parts and before cleaning. Avoid contact with any moving parts. Do not place the fan
or any parts near an open ame, cooking or other heating appliance. Do not operate any ap-
pliance with a damaged cord or plug or after the appliance malfunctions or has been dropped
damaged in any manner. The use of appliance cord is not recommended or sold by the appli-
ance manufacturer to be used separately from the fan and may cause hazardous situations if
used apart or on other appliances. Do not let the power cord hang over the edge of a table or
counter or come into contact with hot surfaces. To disconnect from the electrical supply, grip
the plug and pull from the wall outlet. Do not pull on the cord only to remove from wall outlet
or damage could occur. Always use fan on a dry, level surface. Do not operate without the fan
grilles properly in place.
This product is intended for household use only and not for commercial or industrial applica-
tions.
Should the appliance stop working, rst check the fuse in the plug or fuse/circuit breaker in the
home/ofce, before contacting the manufacturer or service agent. If the supply cord or plug
is damaged, it must be replaced by the manufacturer or the service agent to avoid a hazard.
The appliance contains no user serviceable parts and should the product suffer damage or
breakdown it must be returned to the manufacturer or service agent. Do not use outdoors. Do
not run cord under carpeting. Do not cover cord with throw rugs, runners, or similar coverings.
Arrange cord away from trafc area and where it will not be tripped over.
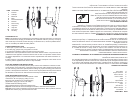
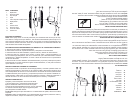
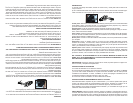
ASSEMBLY INSTRUCTIONS
Tools required: Wrench or pliers and a Phillips head screw driver (not included).
Please assemble fan according to the illustration diagram.
CAUTION: NEVER REMOVE THE HICH HOLDS THE FAN HEAD IN PLACE.
1. Unscrew the plastic collar from the shaft en e motor housing by turning the collar COUN-
TER CLOCKWISE.
2. Remove the Rear Grill Mounting Nut. Place the Rear Grill onto the Motor Housing, make
sure the Handle on the Rear Grill is up.
3. Tighten the Rear Grill Mounting Nut CLOCKWISE. Secure the rear grill to the motor housing
with the plastic collar.
4. Insert the blade onto the motor shaft, matching the slot on the back of the blade with the
shaft pin, secure blade with blade cap, turning COUNTER·CLOCKWISE to tighten.
5. Test blade operation by rotating it with your hand. There should be no friction with the plastic
collar. If blade does not rotate freely, repeat Step 4.
6. Mount the front grill to the rear grill by positioning the clips on the front grill over the rear grill.
Secure the two grills with the clips attached to the rear grill.
7. Screw the wall Hang Hook on the desired wall rmly.
8. Attach the wall fan on the Hang Hook, making sure it is securely mounted before operation
CAUTION: To avoid the risk, make sure the Front and Rear Grilles are at
tached properly before operating.
FINALIDAD DE USO
Este producto tiene como nalidad ser utilizado sólo en interiores y para nes residenciales
o en una ocina. No está diseñado para usos industriales o de otra índole comercial. Utilice
el ventilador con el cableado adecuado conforme al código de electricidad de su estado. Si
tuviera alguna duda con respecto a la conformidad del cableado, consulte con un electricista
calicado.
PAUTAS PARA UN FUNCIONAMIENTO SEGURO
Al momento de utilizar cualquier electrodoméstico, debe seguirse las siguientes precauciones
de seguridad básicas:
Utilice el ventilador sólo para los nes que ha sido fabricado tal como se describe en el man-
ual de instrucciones. Para evitar una descarga eléctrica, no sumerja el aparato, el enchufe ni
el cordón en agua ni le aplique líquidos en aerosol. Debe tenerse sumo cuidado si se utiliza
el electrodoméstico en la presencia de niños. Desconecte el electrodoméstico si no lo va a
utilizar, si lo traslada de un lugar a otro, antes de colocar o retirar piezas y antes de proceder
con la limpieza. Nunca inserte los dedos, lápices u otro tipo de objetos a través de las rejillas
mientras el ventilador se encuentre funcionando. Desconecte el ventilador antes de proceder
con la limpieza. No utilice el ventilador en una ventana ya que la lluvia podría causar algún
tipo de eventualidad eléctrica. No utilice el electrodoméstico en la presencia de explosivos y
/ o sustancias inamables. No coloque el ventilador ni ninguna de sus piezas cerca de una
llama viva o electrodomésticos de cocina o de calentamiento. No utilice el electrodoméstico si
el cordón o el enchufe se encuentran dañados, después de que el electrodoméstico presente
un desperfecto o haya sufrido algún tipo de caída o daño. Para desconectar, sujete el enchufe
y retire del tomacorriente. Nunca tire del cordón. Ese producto ha sido diseñado para uso do-
méstico solamente y no para usos comerciales o industriales. No utilice el ventilador cerca de
cortinas, plantas, accesorios de ventanas, etc. No coloque el cable debajo de la alfombra. No
cubra el cable con alfombras, tapetes o cubiertas similares. Coloque el cable lejos de zonas
transitadas y donde no se tropiece con ellos.
INSTRUCCIONES PARA EL ARMADO
Herramientas requeridas: Llave o alicate y un destornillador Phillips (no incluidos)
Proceda con el armado del ventilador de acuerdo al diagrama o ilustración.
PRECAUCIÓN: NUNCA RETIRE LA PERILLA SUEJETADORA QUE MANTIENE
LA CEBEZA DEL VENTILADOR EN SU LUGAR.
1. Desenrosque el collar de plástico del extremo del tubo principal de la base del motor gi-
rando el collar en el sentido contrario a las agujas del reloj.
2. Retire la tuerca de sujeción de la rejilla posterior. Coloque la rejilla posterior sobre la base
del motor. Asegúrese de que el mango en la rejilla posterior quede hacia arriba.
3. Ajuste la tuerca de la rejilla posterior en el sentido de las agujas del reloj. Asegure la rejilla
posterior a la base del motor utilizando el collar de plástico.
4. Inserte las aspas sobre el tubo principal del motor, encajando la ranura en la parte posterior
de las aspas con la clavija del tubo principal. Asegure las aspas con el tapón, girando en el
sentido contrario a las agujas del reloj para ajustar.
5. Para vericar el funcionamiento de las aspas, hágalas girar con la mano. No debe existir
ningún tipo de fricción con el collar de plástico. Si las aspas no giran libremente, repita el paso 4.
6. Coloque la rejilla delantera sobre la rejilla posterior colocando los ganchos de la rejilla
delantera sobre la rejilla posterior. Asegure las dos rejillas juntas con los ganchos acoplados
a la rejilla posterior.
7. Atornille el gancho para colgar de pared sobre la pared de su preferencia de manera que
quede bien asegurado.
8. Coloque el ventilador de pared sobre el gancho para colgar, asegurándose de que quede
rme antes de hacerlo funcionar.
PRECAUCIÓN: Para evitar riesgos, asegúrese de que la rejilla frontal y trasera
estén conectadas correctamente antes de operar.