


11
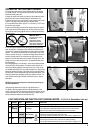
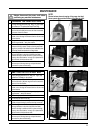
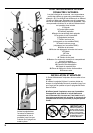
CHANGING THE PAPER DUST BAG
Change the bag whenever the “Bag Full” (15) indica-
tor comes on. To replace the Paper Dust Bag:
1.
Disconnect the power cord from the electrical outlet. Pull
the Dust lid button (16) and remove the Dust lid outwards
to remove it from the cleaner.
2.
Push downwards at the edge to the left of the plastic
holder, so that the bag inlet loosens from the vacuum inlet
of the machine.
3.
Grasp at the cardboard piece of the bag and gently pull
the full bag outwards - away from cleaner.
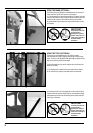
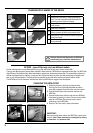
4.
Insert a new paper dust bag into the slot of the bag holder
and push the bag in place. Check so that the paper dust
bag not is jammed in the holder.Only the cardboard piece
of the bag should be attached to the bag holder.
5.
Push the bag holder with the new bag upwards, so that
the bag inlet fasten to the inlet of the machine. Make
sure that the bag is unfold and will fi t in place at the bag
housing. Also check that the ”no bag” clip is placed to the
left so that the lid will be able to close.
6.
Fit the two notches of the back cover to the two slots at
the lower part of the bag housing, and push the back
cover back in place at the housing.
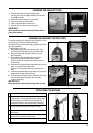
EMPTYING THE CLOTH DUST BAG
Empty the Bag whenever the “Bag Full” Light (15)
comes on. To empty or to replace:
1.
Disconnect the power cord from the electrical outlet. Pull
the Dust lid button (16) and drag the Dust lid outwards to
remove it from the cleaner.
2.
Push downwards at the edge to the left of the plastic
holder, so that the bag inlet loosens from the vacuum inlet
of the machine.
3.
Grasp at the plastic fl ange of the bag and gently pull the
bag outwards - away from cleaner.
4.
Remove bag clip and shake out bag contents.
5.
Put the bag clip back on the bag.
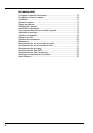
6.
Insert the cleaned/new cloth bag into the slot of the bag
holder and push the bag in place so that bag is secured.
7.
Push the bag holder with the new bag upwards, so that
the bag inlet fasten to the inlet of the machine. Make
sure that the bag is unfold and will fi t in place at the bag
housing. Also check that the ”no bag” clip is placed to the
left so that the lid will be able to close.
8.
Fit the two notches of the back cover to the two slots at
the lower part of the bag housing, and push the back
cover back in place at the housing.
MAINTENANCE
1
2
1
2
3, 4
5
56
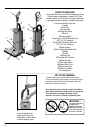
NOTE!
Photos belows shows changing of the paper dust bag!
Never operate the machine without a Dust Bag in place.
Always disconnect the power cord before
performing any machine maintenance.
3
3
4
4