


2-36
Cisco Video Surveillance IP PTZ Dome Camera User Guide, Cisco 2900 Series IP Dome
OL-24281-01
Chapter 2 Operation
A/V Streams Tab
To use audio with the camera you must have an audio device connected to the accessory port located on
the back of the camera. After the device is connected, audio can only be enabled through the primary
stream.
Audio and video may not be synced when viewing and listening to the primary stream through a Web
browser. You may experience a three-second delay in video when viewing the primary stream with audio.
Note Improper use of audio/visual recording equipment may subject you to civil and criminal penalties.
Applicable laws regarding the use of such capabilities vary between jurisdictions and may require,
among other things, express written consent from the recorded subjects. You are solely responsible for
ensuring strict compliance with such laws and for strict adherence to all rights of privacy and personalty.
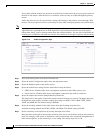
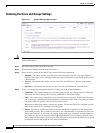
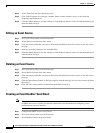
Figure 2-10 Audio Configuration Page
Step 1 Place your mouse pointer over the A/V Streams tab.
Step 2 Select the Audio Configuration option from the drop-down menu.
Step 3 Select the Enabled option in the Audio section.
Step 4 Select the audio device setting from the Audio Device drop-down box.
• USB Line In—Enables audio from a microphone connected to the USB accessory port.
• Native Line In—Enables audio from a microphone connected to the audio-in connector.
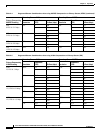
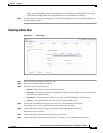
Step 5 Select the sample rate from the Sample Rate drop-down box
The sample rate is the quality of the audio stream (rendered in hertz per second). The higher the value,
the higher the audio quality. Available sample rate settings are 8000, 11025, 16000, 22050, 32000,
44100, and 48000 Hz. The default setting is 8000 Hz.
Step 6 Select the encoding method for the audio device from the Encoding drop-down box.
Available encoding methods are PCMU, PCMA, and PM16. The default setting is PCMU.
Step 7 Set the sensitivity of the input level by moving the Input Level slider.
Move the slider to the right to increase the sensitivity level; move it to the left to decrease the sensitivity
level. For example, if the camera is installed in a noisy environment or the connected microphone has a
built-in line amplifier, set the sensitivity to a low setting. The setting range is 0 to 100.