


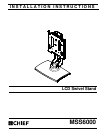


Installation Instructions MSS6000
5
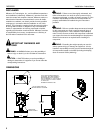
INSTALLATION
Mount Installation
Free Standing (not anchored) Applications Only:
NOTE: Do not perform this step if you are going to anchor the
stand to a surface.
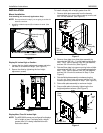
1. Install five rubber bumpers (B) on bottom of stand. (See
Figure 1)
Figure 1
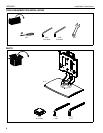
Display 24 Inches High or Smaller:
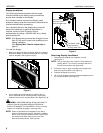
1. Loosen the four height adjustment screws and raise
the slide to its maximum height. (See Figure 2)
2. Secure the slide by tightening the four height
adjustment screws.
Figure 2
Display More Than 24 Inches High:
NOTE: The MSS-6000 comes pre-configured for displays
24” in height or less. If a display with a height
greater than 24" is being installed follow the
instructions below.
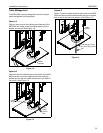
To install a display with a height greater than 24":
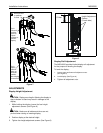
1. Remove slide plate assembly from the base by
removing four 5/16-18 x 3/4" button head cap screws, and
four 1/4" flat washers. (See Figure 3)
Figure 3
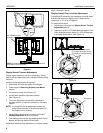
2. Remove face plate from slide plate assembly by
removing two 3/8"-16 x 1" round head carriage bolts,
two 1" OD x .563 ID spacers, two 3/8" flat washers,
and two 3/8-16 lock nuts. (See Figure 5)
3. Reinstall face plate into upper mounting holes of slide
plate using two 3/8"-16 x 1" round head carriage bolts,
two 1" OD x .563 ID spacers, two 3/8" flat washers,
and two 3/8-16 lock nuts removed in Step 2. (See
Figure 5)
4. Reinstall slide plate assembly onto base using four
5/16-18 x 3/4" button head cap screws and four 1/4" flat
washers previously removed in Step1. (See Figure 3)
5. Raise slide plate assembly to maximum height.
6. Secure slide plate in place by tightening the four
height adjustment screws. (See Figure 2)
Figure 4
View from Bottom
Rubber Bumpers
(5 places)
Faceplate Height Adjustment Screws (4)
x 4
x 4
1
Slide
Plate
Assembly
Base
Assembly
4
x 4
Face
Plate
Slide
Plate
Carriage Bolt
Spacer
Flat
Washer
Lock
Nut