


Installation Instructions Model: FSA-1017
3
NOTE: The following steps reuse hardware set aside
during existing mount preparation.
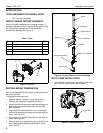
2. Place large Nylon washer into seat in pole mount
front. (see Figure 4)
3. Slide pivot pin through large nylon washer and down
into pole mount front. (see Figure 4)
4. Slide swing arm assembly down onto top of pivot pin.
5. Assemble two flat waskhers and one nylon washer
onto button head cap screw. (see Figure 4)
6. While holding Nylock nut, previously installed into
pole mount front, slide button head cap screw with
washers through swing arm and down into pole mount
front until contact with Nylock nut is made.
7. Secure swing arm to pole mount front by screwing
button head cap screw into nylock nut.
NOTE: It may be necessary to move Nylock nut slighty
in order to allow button head cap screw to
properly seat in nut and allow tightening.
Figure 4: Install Swing Arm to Front Pole Mount
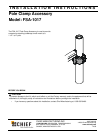
8. Place pole mount front with swing arm against pole in
approximate mounting location.
9. Place three BHCS (30) into pole mount rear (20) and
place against pole aligning with mount front (10).
10. Secure pole mount rear (20) to pole mount front (10)
and pole by tightening three BHCS (20) using 5/32"
hex key.
Figure 5: Mount FSA-1017 with Swing Arm on Pole
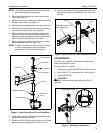
ADJUSTMENTS
The FSA-1017 allows for both vertical and horizontal
position adjustment on pole.
To adjust FSA-1017 position:
1. Loosen single (right) rear BHCS (30). (see Figure 6)
2. Move FSA-1017 to desired position. (see Figure 6)
3. Tighten BHCS (30).
CAUTION!
ALWAYS use two people when adjusting FSA-1017
position.
Figure 6: Pole Mount Adjustment
Flat Washer
Phillips BHCS
Flat Washer
Nylon Washer
Swing Arm
Large Nylon Washer
Pivot Pin
Pole Mount
(Front)
Recessed Seat
Pole Mount front (10)
with Swing Arm
(30)
Pole
(20)
View From Rear
Adjustment Screw