


Model: FSA-1017 Installation Instructions
2
INTRODUCTION
TOOLS REQUIRED FOR INSTALLATION
• 5/32" Hex Key (provided)
INSPECT MOUNT BEFORE ASSEMBLY
Carefully inspect components for shipping damage . If
damage is apparent, call your carrier claims agent and do
not continue with installation until the carrier has
reviewed the damage.(see Figure 1)
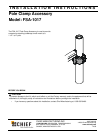
Figure 1: PARTS
EXISTING MOUNT PREPARATION
Prior to installing the FSA-Pole clamp, the existing mount
has to be modified.
To prepare the existing mount:
1. Remove display, if present, from existing mount
following the instructions supplied with mount.
2. Loosen button head cap screw securing swing arm to
base on existing mount using a 5/32" hex key (40).
(see Figure 2)
3. Uninstall button head cap screw, one nylon washer,
and two flat washers from swing arm and set aside for
reuse. (see Figure 2)
4. Lift swing arm up and off of pivot pin and set aside for
reuse. (see Figure 2)
5. Remove large nylon washer, pivot pin, and Nylock nut
from existing mount base and set aside for reuse.
(see Figure 2)
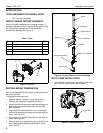
Figure 2: Remove Mount from Existing Base
POLE CLAMP INSTALLATION
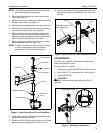
1. Insert Nylock nut (previously set aside) crown down
into front half of pole clamp. (see Figure 3)
Figure 3: Insert Nylock Nut
Table 1: Parts
Ref. Description QTY
10 CLAMP, Front, Pole Mount 1
20 CLAMP, Rear, Pole Mount 1
30 SCREW, Button Head Cap, 3
40 KEY, Hex, 5/32" (not shown) 1
10
20
30
Flat Washer
BHCS
Flat Washer
Nylon Washer
Nylock Nut
Swing Arm
Large Nylon Washer
Pivot Pin
Existing Mount Base
Nylock Nut
(10)