14
C5 Clevis Pin
C7 Hex Bolt C2 Nut C19 Clevis Pin C3 Lock Washer
C4 Ring Fastener
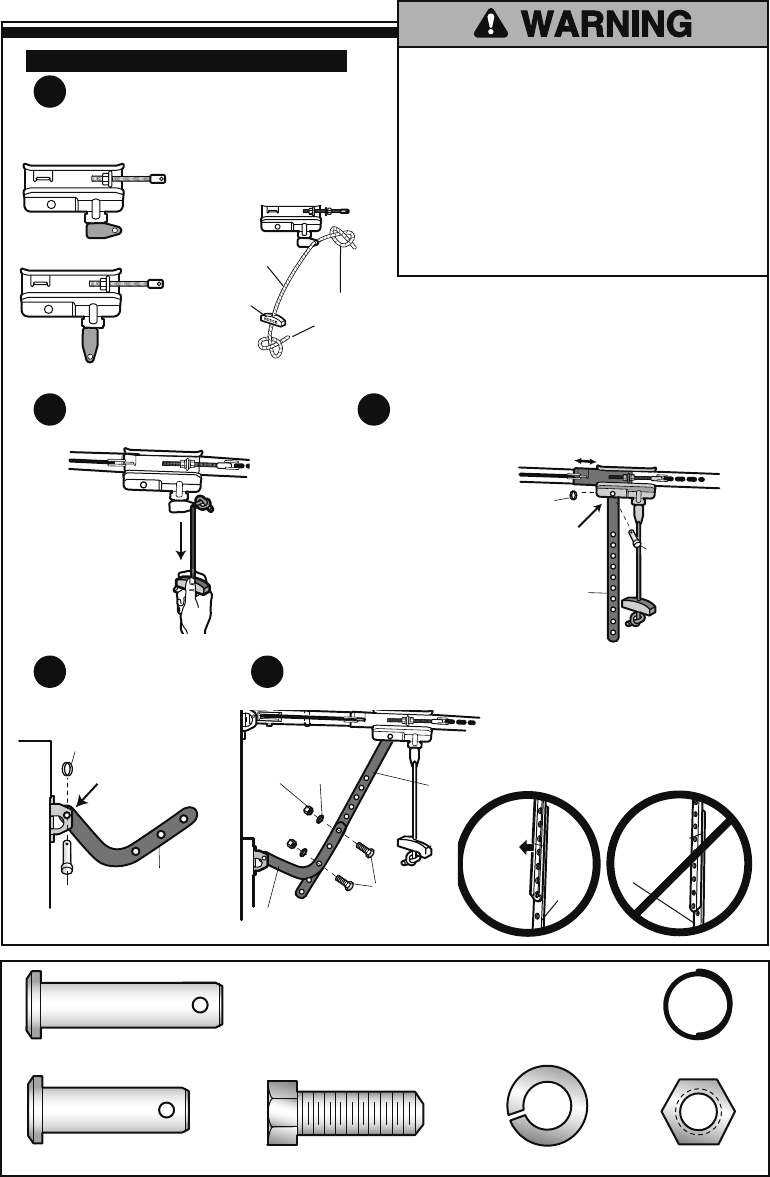
ATTACH DOOR ARM TO TROLLEY
ALL HARDWARE SHOWN ACTUAL SIZE
Attach Emergency Release Rope and Handle
Mount the emergency release
within reach, but at least 6 feet
(1.83 m) above the fl oor, avoiding
contact with vehicles to prevent
accidental release and secure with
a knot.
Pull Emergency Release Rope to
Disengage the Trolley
Slide Trolley Back 2" (5 cm) and Connect Straight
Door Arm to the Trolley
Connect Curved Door
Arm to the Door Bracket
Ensure Door is Fully Closed and
Connect Door Arms
CONNECT DOOR ARM TO TROLLEY
NOTE: If it is necessary to cut the emergency release
rope, seal the cut end with a match or lighter to prevent
unraveling. Ensure the emergency release rope and handle
are above the top of all vehicles to avoid entanglement.
To prevent possible SERIOUS INJURY or DEATH from
a falling garage door:
• If possible, use emergency release handle to
disengage trolley ONLY when garage door is
CLOSED. Weak or broken springs or unbalanced door
could result in an open door falling rapidly and/or
unexpectedly.
• NEVER use emergency release handle unless garage
doorway is clear of persons and obstructions.
• NEVER use handle to pull door open or closed. If rope
knot becomes untied, you could fall.
Straight
Door
Arm
Curved
Door
Arm
(Groove
facing out)
CORRECT
Straight
Door Arm
Curved
Door Arm
INCORRECT
IMPORTANT: The groove on the
straight door arm MUST face
away from the curved door arm.
1
2 3
4 5
ENGAGED
Overhand
Knot
Pull Down
to Release
Trolley
2" (5 cm)
A5 Straight Door Arm
A5
Straight
Door
Arm
A1
Curved
Door
Arm
C2 Nut
A1 Curved Door Arm
C4 Ring Fastener
C4 Ring Fastener
C19 Clevis Pin
C5
Clevis Pin
C3
Lock
Washer
Connect Straight
Door Arm to Trolley
Connect Curved
Door Arm to
Door Bracket
C7 Hex Bolt
C18
Emergency
Release
Handle
C17 Rope
RELEASED


