


9
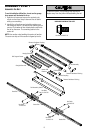
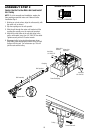
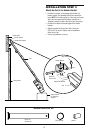
Assemble the Rail (continued)
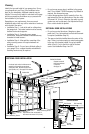
3. Attach rail support braces to the back rail. Loosely
insert 1/4-20x7/16" hex bolts into the aligned holes of
the end rail and rail support brace (Figure 1). Do not
fi nger tighten.
4. Extend the drive screw a few inches from the center
rail, and slide the sleeve onto the long journal
(Figure 2).
5. Interlock the long and short journal of the center and
back rails. Slide the sleeve over the journal connection
(Figure 3).
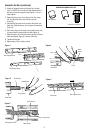
6. Place the c-clip onto the long journal shaft (center rail)
to ensure that the sleeve does not slide (Figure 4).
7. Slide the center rail so that the center rail and rail brace
holes are aligned (Figure 5). Secure with bolts.
8. Tighten all hex bolts.
9. Repeat steps 3-8 for header section.
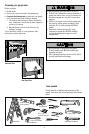
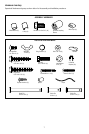
HARDWARE SHOWN ACTUAL SIZE
Metal Sleeve C-Clip
Hex Bolt 1/4-20x7/16"
Rail Support Brace
Rail Support Brace
Rail
Figure 1
Figure 2
Figure 3
Figure 4
Figure 5
Metal
Sleeve
C-Clip
Center Rail
Metal Sleeve
Long Journal
Drive Screw
Center Rail
Center Rail
Rail Support Brace
Long Journal
Short Journal
Rail Support Brace
Metal Sleeve