


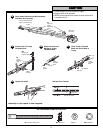
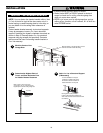
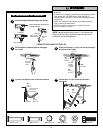

Before you begin:
• Disable locks (contact your door manufacturer for
information on disabling your door locks.)
• Remove any ropes connected to garage door.
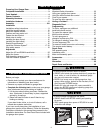
• Complete the following test to make sure your garage
door is balanced and is not sticking or binding:
1. Lift the door about halfway as shown. Release the
door. If balanced, it should stay in place, supported
entirely by its springs.
2. Raise and lower the door to see if there is any
binding or sticking.
If your door binds, sticks, or is out of balance, call a
trained door systems technician.
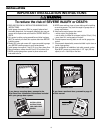
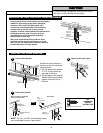
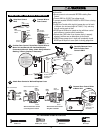
If you have a one-piece door, the installation of your
garage door opener will be different. Follow the assembly
instructions included in this manual then proceed to the
Installation Instructions For One-Piece Doors included with
the garage door opener.
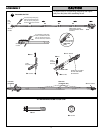
To prevent damage to garage door and opener:
• ALWAYS disable locks BEFORE installing and operating
the opener.
• ONLY operate garage door opener at 120V, 60 Hz to avoid
malfunction and damage.
To prevent possible SERIOUS INJURY or DEATH:
• ALWAYS call a trained door systems technician if garage door
binds, sticks, or is out of balance. An unbalanced garage
door may not reverse when required.
• NEVER try to loosen, move or adjust garage door, door
springs, cables, pulleys, brackets or their hardware, ALL of
which are under EXTREME tension.
• Disable ALL locks and remove ALL ropes connected to
garage door BEFORE installing and operating garage door
opener to avoid entanglement.
WARNINGWARNING
CAUTION
WARNING
WARNING
WARNING
CAUTIONCAUTION
WARNING
WARNING
Sectional Door
Preparing Your Garage Door . . . . . . . . . . . . . . . . . . . . . 2
Completed Installation . . . . . . . . . . . . . . . . . . . . . . . . . . 3
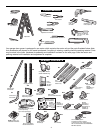
Tools Needed. . . . . . . . . . . . . . . . . . . . . . . . . . . . . . . . . . 4
Opener Contents. . . . . . . . . . . . . . . . . . . . . . . . . . . . . . . 4
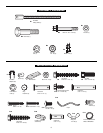
Assembly Hardware . . . . . . . . . . . . . . . . . . . . . . . . . . . . 5
Installation Hardware . . . . . . . . . . . . . . . . . . . . . . . . . . . 5
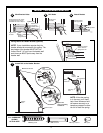
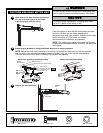
Assembly . . . . . . . . . . . . . . . . . . . . . . . . . . . . . . . . . . . 6-8
Installation
Installation safety instructions. . . . . . . . . . . . . . . . . . . . . . 9
Install the header bracket . . . . . . . . . . . . . . . . . . . . . . . . 10
Mount the header bracket. . . . . . . . . . . . . . . . . . . . . . . . 11
Position and hang motor unit . . . . . . . . . . . . . . . . . . . . . 12
Fasten the door bracket . . . . . . . . . . . . . . . . . . . . . . . . . 13
Attach door to trolley. . . . . . . . . . . . . . . . . . . . . . . . . . . . 14
Installing the door control . . . . . . . . . . . . . . . . . . . . . . . . 15
Installing the light bulb(s) . . . . . . . . . . . . . . . . . . . . . . . . 16
Electrical requirements . . . . . . . . . . . . . . . . . . . . . . . . . . 16
Install the Protector System
®
. . . . . . . . . . . . . . . . . . . 17-18
Wire safety sensor . . . . . . . . . . . . . . . . . . . . . . . . . . . . . 19
Adjustment
Adjust the UP and DOWN travel limits . . . . . . . . . . . . . . 20
Adjust the forces. . . . . . . . . . . . . . . . . . . . . . . . . . . . . . . 21
Test the safety reversal system . . . . . . . . . . . . . . . . . . . 22
Test the Protector System
®
. . . . . . . . . . . . . . . . . . . . . . . 22
Operation
Important Safety Information . . . . . . . . . . . . . . . . . . . . . 23
Using your garage door opener . . . . . . . . . . . . . . . . . . . 23
Using the wall-mounted door control . . . . . . . . . . . . . . . 24
Care of your opener . . . . . . . . . . . . . . . . . . . . . . . . . . . . 24
To open the door manually . . . . . . . . . . . . . . . . . . . . . . . 24
Having a Problem? . . . . . . . . . . . . . . . . . . . . . . . . . . . . 25
Diagnostic Chart . . . . . . . . . . . . . . . . . . . . . . . . . . . . . . 26
Programming
To add or reprogram an additional
hand-held remote control . . . . . . . . . . . . . . . . . . . . . . . . 27
To control the opener lights . . . . . . . . . . . . . . . . . . . . . . 27
Multi-function remotes. . . . . . . . . . . . . . . . . . . . . . . . . . . 27
To add, reprogram or
change a keyless entry PIN . . . . . . . . . . . . . . . . . . . . . . 28
To change an existing, known PIN . . . . . . . . . . . . . . . . . 28
To set a temporary PIN. . . . . . . . . . . . . . . . . . . . . . . . . . 29
To erase all codes from motor unit memory . . . . . . . . . . 29
The remote control battery . . . . . . . . . . . . . . . . . . . . . . . 29
Repair Parts
Rail assembly parts . . . . . . . . . . . . . . . . . . . . . . . . . . . . 30
Installation parts . . . . . . . . . . . . . . . . . . . . . . . . . . . . . . . 30
Motor unit assembly parts. . . . . . . . . . . . . . . . . . . . . . . . 31
Accessories. . . . . . . . . . . . . . . . . . . . . . . . . . . . . . . . . . 32
Notes. . . . . . . . . . . . . . . . . . . . . . . . . . . . . . . . . . . . . 33-34
Warranties . . . . . . . . . . . . . . . . . . . . . . . . . . . . . . . . . . . 35
Repair Parts and Service . . . . . . . . . . . . . . . . . . . . . . . 36
TABLE OF CONTENTS
PREPARING YOUR GARAGE DOOR
2
One-Piece Door
See addendum