


19
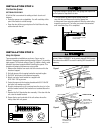
INSTALLATION STEP 12
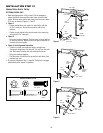
Connect Door Arm to Trolley
SECTIONAL DOORS ONLY
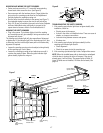
Make sure garage door is fully closed. Pull the emergency •
release handle to disconnect the outer trolley from the inner
trolley. Slide the outer trolley back (away from the door) about
2" (5 cm) as shown in Figures 1, 2 and 3.
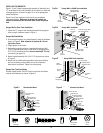
Figure 1:•
Fasten straight door arm section to outer trolley with the –
5/16"x1" clevis pin. Secure the connection with a ring
fastener.
Fasten curved section to the door bracket in the same way, –
using the 5/16"x1" clevis pin.
Figure 2:•
Bring arm sections together. Find two pairs of holes that line –
up and join sections. Select holes as far apart as possible to
increase door arm rigidity.
Figure 3, Hole alignment alternative:•
If holes in curved arm are above holes in straight arm, –
disconnect straight arm. Cut about 6" (15 cm) from the solid
end. Reconnect to trolley with cut end down as shown.
Bring arm sections together. –
Find two pairs of holes that line up and join with bolts, lock –
washers and nuts.
Proceed to Adjustment Step 1, page 20. Trolley will re-engage •
automatically when opener is operated.
Ring
Fastener
Door
Bracket
Clevis Pin
5/16"x1-1/4"
Curved
Door Arm
Straight
Door Arm
Clevis Pin
5/16"x1"
Inner Trolley
Outer Trolley
Lock
Washers
5/16"
Nuts
5/16"-18
Door Bracket
Bolts
5/16"-18x7/8"
Emergency
Release
Handle
Lock
Washers
5/16"
Nuts
5/16"-18
Bolts
5/16"-18x7/8"
Cut This End
Figure 1
Figure 2
Figure 3
Rondelle-frein
de 5/16 po
Écrou de
5/16 po-18
Anneau
d'arrêt
Boulon hexagonal de
5/16 po-18 x 7/8 po
Axe de chape de
5/16 po x 1 po (Chariot)
Axe de chape de
5/16 po x 1-1/4 po
(Support de la porte)
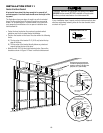
Clevis Pin 5/16"x1"
Hex Bolt
5/16"-18x7/8"
Lock Washer 5/16"
Nut 5/16"-18
Clevis Pin 5/16"x1-1/4"
Ring
Fastener
HARDWARE SHOWN ACTUAL SIZE