


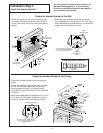
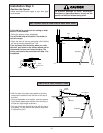

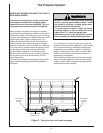
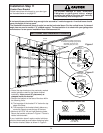

• Install a 75 watt maximum light bulb in each
socket. The lights will turn ON and remain lit for
approximately 4-1/2 minutes when power is
connected. Then the lights will turn OFF.
• If the bulbs burn out prematurely due to vibration,
replace them with "Garage Door Opener" bulbs.
• Slide lenses into guides as shown. Snap bottom
tabs into lens slots.
• For convenience, the lenses may be installed
after Adjustment Step 4 on page 30.
• Reverse the procedure to remove the lenses.
Installation Step 7
Install the Lights and the Lenses
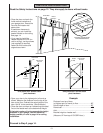
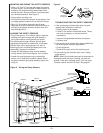
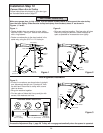
Installation Step 8
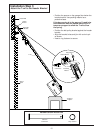
Attach the Manual Release
Rope and Handle
Do not use the red handle to pull the door
open or closed.
The rope knot could become
untied and you could fall.
Use the manual
release only to disengage the trolley and, if
possible, only when the door is closed.
Garage doors are heavy. If the door is open
when the handle is pulled, the door could
close inadvertently if it is not properly
balanced. Serious injury may result to persons
under the door. Make sure the doorway is clear
of persons and obstructions before pulling
handle when door is open.
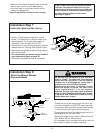
• Thread one end of the rope through the hole in the
top of the red handle so "NOTICE" reads right side
up as shown. Secure with an overhand knot at least
1" from the end of the rope to prevent slipping.
• Thread the other end of the rope through the hole in
the release arm of the outer trolley.
• Adjust rope length so the handle is 6 feet above the
floor. Secure with an overhand knot .
If it is necessary to cut the rope, heat seal the cut end
with a match or lighter to prevent unraveling.
Trolley
NOTICE
Overhand
Knot
Manual
Release Handle
Rope
Overhand
Knot
Trolley
Release Arm
19
75 Watt Max.
Light Bulb
Lens
Guide
Lens Tab
Lens Slot
Lens Tab
75 Watt Max.
Light Bulb
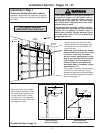
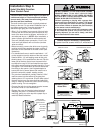
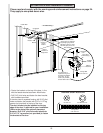
WARNING
Do NOT connect the power and operate the opener
at this time.
The trolley will travel to the full
open
position but will not return to the
close
position until
the sensor beam is connected and properly aligned.
See Safety Reversing Sensor Instructions
beginning on page 21.
• Attach the User Safety Instruction label to the wall
near the door control, and the Maintenance
Instruction label in a prominent location on the
inside of the garage door.
Page 32 explains how to use the door control.