


5
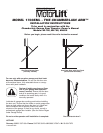
Door Arm Installation
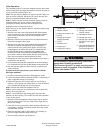
• With a 4.5mm (3/16") bit, drill two holes, 25mm (1")
deep.
To prevent damage to garage door, do NOT drill through the
entire door.
WWARNARNINGING
CAUTIONCAUTION
WWARNARNINGING
WWARNARNINGING
1
2
3
1
A
B
C
1
Figure 12
A
BC
3
2
4
5
1
5
1
6
5
1
8
7
7
FIGURE 12
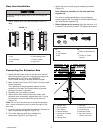
• Attach the door arm with proper hardware provided
(Figure 12).
Note: Whenever possible, use the nuts and bolts
supplied (A).
For metal or metal-braced doors, use self-tapping
screws supplied (B). For timber or timber-braced doors,
use wood screws supplied (C).
• Before tightening the screws, align the door arm so it
is vertical. Use a level to assist. The tighten the screws.
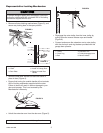
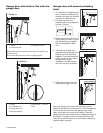
Connecting the Extension Arm
1. Select the two bottom holes in the door arm that will
allow the screws to go into a cross bracing support of
the door (Figure 13). Door may REQUIRE
ADDITIONAL bracing to provide suitable support.
2. Mark and drill two 4.5mm (3/16") holes. Use the proper
screws provided.
The centerline of the garage door opener and the
centerline of the door arm should match to prevent
binding of the arm in operation.
3. Recheck and if not aligned, correct.
4. With the door fully closed, slide outer trolley (with
extension arm connected), against door arm. Line up
the extension arm and insert into slot in door arm
(Figure 14).
Note: Do not move the door arm to meet the extension
arm—move the extension arm to meet the angle of the
door arm.
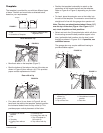
5. Insert the two mounting bolts provided into holes as far
apart as possible and tighten (Figure 15).
6. Cut off the shipping cable tie to release the
mechanism (Figure 14 and Figure 15).
The Chamberlain Group, Inc.
Installation of Chamberlain Door Arm to Canopy Door
Figure 11 Mounting the Door Arm (Bottom Screws)
#114A1604
2/12/93 - 3/11/93 - 5/27/93
Figure 13
5
8
3
9
7
11
10
4
1
2
6
FIGURE 13
1. Exterior of Door
2. Nut
3. Lock Washer
4. Bolt
5. Door Arm
6. Self-trapping screw
7. Timber support
8. Lag screw
A
1. Bolt
2. Lock Washer
3. Nut
B
1. Metal or Metal-Braced
C
1. Timber or Timber-
Braced
1.
Header Wall
2. Rail
Assembly
3. Door Spring
4. Header Bracket
5. Centerline of Header
Bracket
6. Canopy Door
7. Door
Arm
8. Centerline of Door
Arm
9. Cross Bracing
10. Mounting Screw
11. Door Arm must be
vertical (use level)
114A3167A-GB