


37
Chateau™ Direct Vent Gas Fireplace
20011957
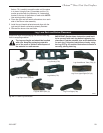
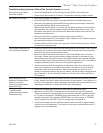
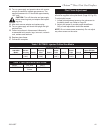
Troubleshooting American Flame Gas Control System (continued)
Pilot is burning, but ignitor
continues to spark
• Check that flame sensor is fully inpinged by pilot flame. If not, adjust pilot.
• Check end-to-end continuity of sensor. If sensor has continuity, repalce module.
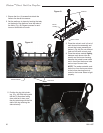
• Verify the gas supply is turned on.
• Ensure the pilot flame will ignite. If not, see pilot flame troubleshooting above.
• Make sure the green and white leads from the module are securely connected to
the terminals labeled “MAIN: on the valve body.
• Make certain the pilot flame is in contact with the flame rectification sensor on the
pilot assembly. This valve is equipped with a pilot flame adjustment screw. If the
pilot flame is too small it will not contact the flame rectification sensor and will not
complete the safety circuit.
• Ensure the pilot flame is properly located to ignite the main flame.
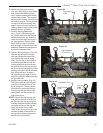
• Does the remote show CP in the display? If yes, childproof is on. Refer to transmit-
ter operating instructions in this manual.
• Check continuity of main burner coil in gas valve. Remove wire connector. If there
is no continuity, replace valve.
• Ensure the black and red leads from the battery pack or the AF4000 110H/L module
are securely connected to the red and black leads from the motor drive located on
the valve body (red to red and black to black).
• Make sure the Pulse/Continuous button on the Power Module is set to Continu-
ous mode. If flame does not continuously change (increase or decrease in size)
while holding down the ON H/L button, the power module mode must be changed.
Hold down the Pulse/Continuous button on the Power Module for 2 to 3 seconds to
change mode from pulse to continuous. Re-try flame adjustment.
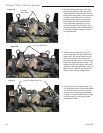
• Check functionality with all transmitters to determine if there is an issue with the
main control system or an individual transmitter. If the issue is with an individual
transmitter, make sure the batteries in both the transmitter and receiver are in-
stalled in the proper direction and are not drained. Individual battery voltage should
be no less than 1.4V for AA and AAA batteries, 2.8V for button cells, and 9.0V for
12V batteries.
• Ensure the transmitter was not recently stored in a different environment (air-condi-
tioned, heated) from that in which the transmitter is being tested. It may take up to 3
hours for the temperature inside a packaged transmitter, and several minutes for an
unpackaged transmitter, to equalize with the room temperature.
• Ensure the thermostatic transmitter is within the 20’ operational range.
• Make sure an ON or OFF command was not last sent from another transmitter.
These commands will override the thermal commands from the handheld transmit-
ter. To return the system to THERMO mode, press either ON or OFF on the ther-
mostatic transmitter, then press the MODE button to put the system in THERMO
mode. Press and hold the SET button to change the set temperature.
• Verify the set temperature on the thermostatic remote is at least 2 degrees above
or below the room temperature. The system will not react to temperatures within 2
degrees of the set temperature.
Main flame will not light
Flame height adjustment will
not work/works backwards
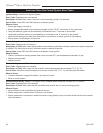
Room temperature dis-
played on handheld trans-
mitter is not correct.
(When using thermostatic
transmitters only)
Unit will not respond in
THERMO mode.
(When using thermostatic
transmitters only)