


9
6
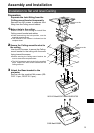
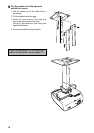
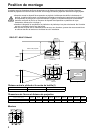
Attach the top of the extension pipe
to the Ceiling-mount bracket
Securetotheextensionpipeusingthefour
suppliedM5screws.
●Theopenendofthepipeshouldfacetheopen
endoftheCeiling-mountbracketasshown.
7
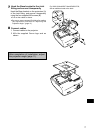
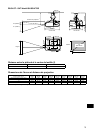
Attach the Joint tting to the bottom
of the extension pipe
UsethefourM5screwsremovedfromthe
Ceiling-mountbracketduringpreparation.
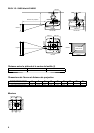
8
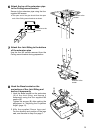
Hook the Base bracket on the
projections of the Joint fitting and
secure it temporarily
1 HooktheBasebracketontheprotrusion
(A)oftheJointfitting,andsecureit
temporarilyusingthefoursuppliedM5
screws(B).
Tightenthescrews(B)aftermakingthe
adjustmentin"AdjustingtheProjection
Angle"(page11).
2 Affix the suppliedCanon logoseal.
Forthe
directionandpositionofthelogo
seal,seetherefertostep8onpage7.
Directiontothe
screen
Directiontothe
screen
Directiontothe
screen
B
A
B