


6” Min.
6” Min.
6” Min.
6” Min.
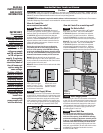
Figure 7
Figure 6
Installation Instructions
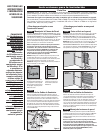
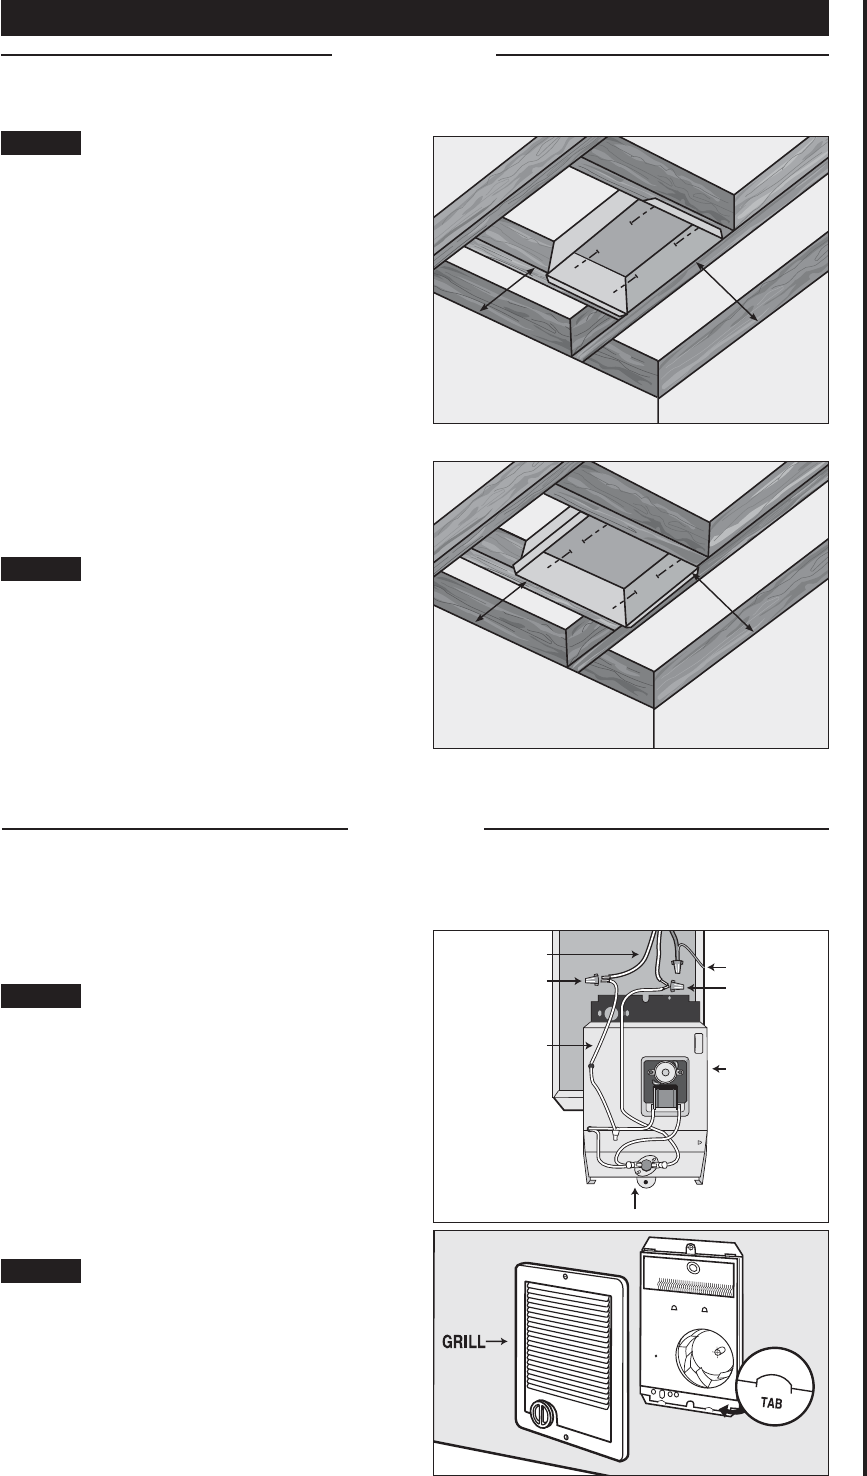
The C Series REQUIRES A MINIMUM distance of
6 inches from all adjacent surfaces. However, Cadet
RECOMMENDS 12 inches from all adjacent surfaces
for longer and cleaner performance. Important:
Do not mount the heater in low-density fiberboard
or false ceilings.
Secure the wall can to studs/rafters on opposite sides
(See Figures 6 and 7) with 4 screws (not provided).
The face of the wall can must extend
1
/
2
or
5
/
8
inches
from face of rafters to allow for thickness of sheetrock.
Insulating materials may touch the wall can however,
“blown-in” insulation is not recommended as it could
be drawn into the heater through gaps behind the grill.
For ceiling installation, the wall can must be boxed in
with wood on all sides and back to prevent dust from
entering the heater through the ceiling cavity.
Part One
WARNING
Risk of Electrical
Shock. Connect
grounding lead
to grounding wire
provided. Keep
all foreign objects
out of heater.
WARNING
Risk of Fire.
Heater must be
kept clear of
all obstructions:
a minimum
of 3 feet in front;
6 inches on both
sides and above.
Heaters must be
kept clean of lint,
dirt and debris.
WARNING
Turn the electrical
power off at the
electrical panel
board (circuit
breaker or fuse
box) and lock or
tag the panel board
door to prevent
someone from
turning on power
while you are
working on the
heater. Failure to
do so could result
in serious electrical
shock, burns, or
possible death.
STEP 1
Mount the Wall Can
Route supply wire from circuit breaker to thermostat
to wall can. Models with a built-in thermostat are not
recommended for ceiling mount. Remove a knockout
in the wall can and attach the supply wire with a strain
relief connector leaving 10 inches wire lead for later
use (See Figure 3). Connect supply ground wire to
grounding pigtail in wall can. Proceed to Part Two.
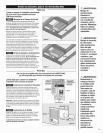
STEP 2
Route Supply Wires
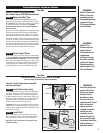
Figure 9
Figure 8
How do I insert the heater assembly
into the wall can?
Turn heater assembly upside-down (element down)
with motor facing you. Connect the supply wires to
the heater wires with wire connectors (See Figure
8). Now rotate the heater so the element and fan are
facing you (with the element ‘up’). Insert the bottom
edge of the heater assembly into the tabs in the
bottom lip of the wall can (See Figure 9).
Important: Push wires into bottom of wall can during
insertion. Be sure that supply wires are not caught
between motor and wall can. Attach assembly at top
with screw provided.
Part Two
After you have followed all instructions in PART ONE
you are ready to install the heater assembly.
TOP
MOTOR
WIRE
CONNECTOR
GROUNDING
PIGTAIL
WIRE
CONNECTOR
HEATER WIRES
SUPPLY
WIRES
BACK
Secure grill with the screws provided. If you have a
built-in thermostat model, slide thermostat knob onto
shaft. Turn power on at the electrical panel board.
Warranty is void if any material is sprayed on the
element or blower.
STEP 1
Install Heater Assembly
STEP 2
Install Grill
How do I install for ceiling mount?
(for models up to 1500 Watts maximum)
3